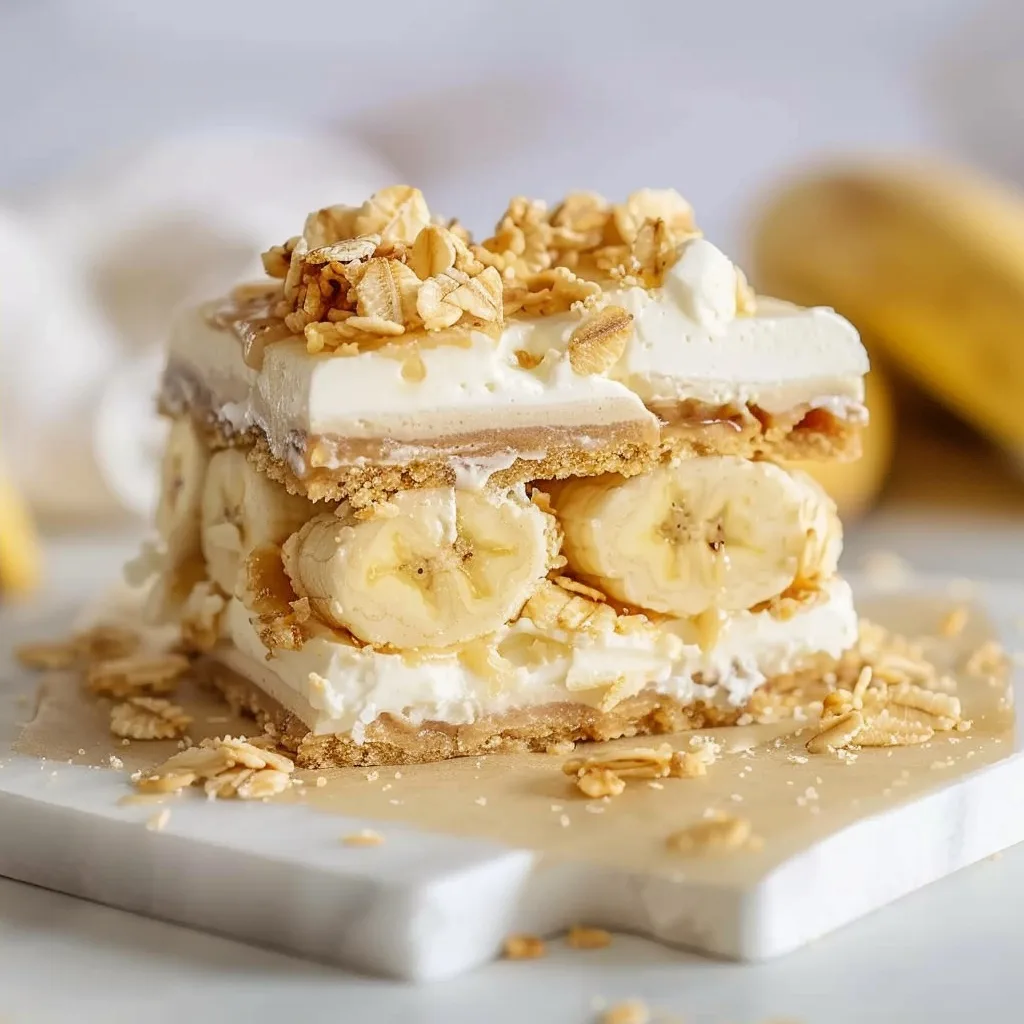
These no-bake banana pudding dream bars are the ultimate dessert for any occasion. A delectable, creamy, and easy-to-make treat, this recipe captures the heartwarming essence of classic banana pudding in a convenient bar form. Imagine layers of sweet vanilla wafers, luscious banana custard, and fresh banana slices, all coming together for an unforgettable experience. This dessert requires no oven time, making it a perfect choice for warm weather or when you need a quick, yet impressive, treat. The simplicity of each step ensures accessibility for cooks of all skill levels, delivering a guaranteed winner every single time. Get ready for a wave of delightful flavors and textures that will have everyone asking for the recipe of these sensational no-bake banana pudding bars.

Recipe Overview
| Prep Time | Cook Time | Total Time | Servings | Difficulty | Cuisine |
|---|---|---|---|---|---|
| 20 minutes | 0 minutes | 4 hours 20 minutes (including chilling) | 12-16 bars | Easy | American |
Why This Recipe Works
This no-bake banana pudding dream bar recipe is a testament to how simple ingredients and a straightforward method can create something truly spectacular. The synergy between the buttery, crunchy vanilla wafer crust and the silken, sweet pudding layer is pure magic. This combination offers a delightful contrast in textures that elevates the dessert beyond just a simple pudding. The fresh banana slices add a natural sweetness and a soft, fruity element that complements the vanilla and creaminess perfectly. It’s all about achieving that classic banana pudding flavor profile without the fuss of baking, making it an ideal dish for busy days or casual gatherings. The minimal effort required truly belies the rich flavor and satisfying texture it delivers, ensuring it becomes a go-to favorite.
The instant pudding mix acts as a fantastic shortcut, providing immediate creaminess and sweetness without the need for cooking and tempering eggs. When combined with milk and folded into the whipped topping, it creates a light yet decadent filling that is incredibly stable. This structural integrity is key to the success of a no-bake bar, ensuring it holds its shape when sliced and served. The refrigeration time is crucial here, allowing the flavors to meld and the bars to set firmly, creating distinct layers that are characteristic of a dream bar. This careful balance of time and ingredients ensures a consistently delicious result that is both delightful to eat and a joy to prepare, embodying the spirit of easy dessert making.
Ingredients
| Ingredient | Quantity | Notes |
|---|---|---|
| Vanilla Wafers | 1 ½ cups, crushed | You can also use graham crackers or shortbread cookies for a different flavor profile. Ensure they are finely crushed for an even crust. |
| Unsalted Butter | 6 tablespoons | Melted. This binds the cookie crumbs together to form the crust. |
| Instant Vanilla Pudding Mix | 2 (3.4 ounce) boxes | Make sure it’s the instant variety, not cook-and-serve, for the no-bake preparation. |
| Milk | 3 cups | Whole milk provides the creamiest texture, but 2% milk works well too. Use cold milk for best results when mixing pudding. |
| Whipped Topping | 1 (8 ounce) container | Thawed. This adds lightness and extra creaminess. Cool Whip is a popular brand, or you can use homemade whipped cream, whipped to stiff peaks. |
| Ripe Bananas | 3 medium | Sliced. Use ripe but firm bananas to prevent them from becoming mushy. |
Step-by-Step Instructions
Prepare the Crust
- Crush 1 ½ cups of vanilla wafers into fine crumbs. A food processor works best for this.
- In a medium bowl, combine the crushed vanilla wafers with 6 tablespoons of melted unsalted butter.
- Stir until the crumbs are evenly moistened.
- Press the buttered crumbs firmly and evenly into the bottom of a 13×9 inch baking dish. Use the back of a spoon or your fingers.
Make the Pudding Filling
- In a large bowl, whisk together the contents of 2 (3.4 ounce) boxes of instant vanilla pudding mix and 3 cups of cold milk.
- Beat with an electric mixer on medium speed for 2 minutes, or until the mixture begins to thicken.
- Gently fold in 1 (8 ounce) container of thawed whipped topping until no streaks of whipped topping remain and the mixture is smooth and uniformly creamy.
- Spoon and spread the pudding mixture evenly over the prepared vanilla wafer crust.
Assemble and Chill
- Peel and slice 3 medium ripe bananas into ¼-inch thick rounds.
- Arrange the banana slices in a single, even layer over the pudding mixture.
- Cover the baking dish tightly with plastic wrap or a lid.
- Refrigerate the banana pudding dream bars for at least 4 hours, or until firm and well chilled. Overnight chilling is also recommended for optimal setting.
- Once chilled and set, cut into bars and serve cold.
Chef Tips for Perfect Results
- Crumb Consistency is Key: Ensure your vanilla wafer crumbs are very fine. This allows them to bind together well and create a cohesive, crisp crust that won’t crumble apart. Pulsing them in a food processor until they resemble coarse sand is ideal.
- Cold is Crucial for Pudding: Always use cold milk when mixing instant pudding. This ensures the pudding thickens properly and achieves the desired smooth, creamy consistency without becoming grainy.
- Gentle Folding Technique: When incorporating the whipped topping, use a gentle folding motion. Overmixing can deflate the whipped topping, resulting in a denser, less airy pudding layer. The goal is to maintain that light, cloud-like texture.
- Even Banana Layer: Distribute the sliced bananas evenly across the pudding layer. This ensures each bar gets a balanced amount of banana flavor. For a cleaner cut, you can sometimes place a layer of plastic wrap directly on top of the bananas before chilling, then peel it off before slicing.
- Adequate Chilling Time: Do not rush the chilling process. Minimum 4 hours is essential for the bars to fully set. Longer chilling, even overnight, allows the flavors to meld beautifully and ensures neat slicing.
Common Mistakes to Avoid
- Using Cook-and-Serve Pudding: This is a common error. Instant pudding is formulated to thicken without heat, while cook-and-serve varieties require cooking. Using the wrong type will result in a pudding that never sets, creating a soupy mess instead of firm bars. Always double-check the box that it says “instant”.
- Overmixing the Pudding: While you need to mix the pudding sufficiently to thicken, overmixing, especially after adding the whipped topping, can cause the mixture to become gummy or break down its structure. Mix just until combined and smooth.
- Not Chilling Long Enough: Impatience is the enemy of no-bake desserts like these banana pudding dream bars. Insufficient chilling means the layers won’t set properly, leading to bars that fall apart when cut and served. Allow the full recommended chilling time for best results.
- Using Overly Ripe Bananas: While ripe bananas are sweet, those that are too soft and mushy can release too much moisture and break down too easily. Opt for ripe but still firm bananas to maintain their shape and provide a pleasant texture.
- Crust Too Thick or Uneven: If the crust is pressed too thick, it can overpower the filling. If it’s uneven, the bar will be difficult to cut cleanly. Aim for a consistent, thin layer pressed firmly into the pan.
Variations and Substitutions
| Ingredient | Substitution | Impact on Flavor |
|---|---|---|
| Vanilla Wafers | Graham Crackers, Shortbread Cookies, Golden Oreos (cream removed) | Graham crackers add a honey-like sweetness; shortbread offers a buttery richness; Golden Oreos provide a familiar sweet cookie flavor. |
| Instant Vanilla Pudding Mix | Instant Banana Pudding Mix, Instant Cheesecake Pudding Mix | Banana pudding mix intensifies the banana flavor; cheesecake pudding adds a tangy, creamy profile. |
| Milk | Almond Milk, Soy Milk, Oat Milk (ensure they are unsweetened for controlled sweetness) | Dairy-free milks can alter the richness. Unsweetened versions prevent the bars from becoming overly sweet. |
| Whipped Topping | Heavy Cream (whipped to stiff peaks with a little sugar) | Homemade whipped cream offers a fresher, less processed taste but may be slightly less stable than commercial whipped topping. |
| Fresh Bananas | Caramel drizzle, thinly sliced strawberries, or toasted coconut flakes (for topping) | Caramel adds a rich, sweet note; strawberries offer a tart contrast; coconut adds texture and tropical flavor. |
Serving Suggestions and Pairings
These delightful banana pudding dream bars are perfect for a variety of occasions. Serve them chilled at backyard barbecues, family potlucks, or as a refreshing dessert after a weeknight dinner. They are also a fantastic option for birthday parties, baby showers, or any celebration where a crowd-pleasing dessert is needed. The individual bar format makes them easy to serve and transport. For a more elegant presentation, garnish each bar with a dollop of extra whipped topping, a sprinkle of crushed vanilla wafers, or a few thin banana slices just before serving. This dessert pairs wonderfully with a scoop of vanilla or caramel ice cream for an extra indulgent treat. A glass of cold milk or a refreshing iced tea makes a simple and satisfying beverage accompaniment.
Storage and Reheating
| Method | Duration | Instructions |
|---|---|---|
| Refrigerator | 3-4 days | Store any leftover banana pudding dream bars in an airtight container in the refrigerator. Ensure they are well-covered to prevent them from drying out or absorbing other odors. Do not attempt to freeze, as the texture of the dairy and bananas will change significantly. |
| Make-Ahead | Up to 24 hours before serving | These bars are ideal for making ahead. Prepare them completely and chill for at least 4 hours. For best results, especially with the fresh banana layer, it’s advisable to add the bananas no more than 12-24 hours before serving to minimize browning. Some prefer to add bananas just before serving if making further in advance. |
Nutritional Information
Approximate values per serving (based on 16 servings):
| Nutrient | Amount per Serving |
|---|---|
| Calories | Approx. 250 |
| Protein | Approx. 3g |
| Total Fat | Approx. 12g |
| Saturated Fat | Approx. 6g |
| Cholesterol | Approx. 15mg |
| Sodium | Approx. 300mg |
| Total Carbohydrates | Approx. 35g |
| Dietary Fiber | Approx. 1g |
| Total Sugars | Approx. 20g |
| Added Sugars | Approx. 15g |
Disclaimer: Nutritional information is an estimate and can vary based on specific ingredients used and serving size.
Frequently Asked Questions
Can I substitute the vanilla wafers in this no-bake banana pudding bar recipe?
Yes, graham crackers, shortbread cookies, or even golden Oreos (with the cream removed) make excellent crust substitutes. Each will impart a slightly different but delicious flavor. The key is to crush them finely and mix them thoroughly with the melted butter for a stable base.
How do I prevent the bananas from browning in these dream bars?
To minimize browning, use bananas that are ripe but still firm. You can also lightly brush the banana slices with lemon juice before arranging them on the pudding layer. Adding the banana layer just before chilling or even just before serving offers the best protection against discoloration.
My instant pudding did not thicken. What happened?
The most common reason for instant pudding not thickening is using milk that wasn’t cold enough or not mixing it for the full recommended time. Ensure your milk is very cold and beat the mixture for at least two minutes until it shows signs of thickening before folding in the whipped topping.
Can I make these banana pudding dream bars ahead of time?
Absolutely, these bars are perfect for making ahead. Prepare the entire dessert and chill for at least 4 hours. For the freshest banana flavor and appearance, consider adding the banana slices just a few hours before serving, or up to 12-24 hours in advance if you have lightly treat them.
How should I cut the bars for neat servings?
For the neatest cuts, use a large, sharp knife. Dip the knife in hot water and wipe it dry between each cut. This helps to slice cleanly through the chilled pudding and crust layers without dragging. A straight, decisive cut is key for presentation.
These no-bake banana pudding dream bars offer a delightful escape into creamy, sweet bliss with every bite. They are incredibly easy to assemble, making them a foolproof dessert for any skill level. The combination of smooth pudding, crisp wafers, and fresh banana is a timeless classic. Embrace the simplicity and enjoy this effortless yet impressive dessert, which truly embodies a dreamy banana pudding experience. [Link to another no-bake dessert recipe] for more easy sweet ideas.
Print
Banana Pudding Dream Bars No Bake
A no-bake, creamy dessert with layers of vanilla wafer crust, banana custard, and fresh banana slices. Simple, festive, and perfect for warm days or last-minute gatherings.
- Total Time: 260
- Yield: 12-16 bars 1x
Ingredients
1 1/2 cups crushed vanilla wafers
1/2 cup softened butter
2 large bananas, mashed
1 package instant vanilla pudding (3.4 oz)
2 cups milk (use halal-certified)
1 cup stabilized whipped topping (alcohol-free)
2–3 ripe bananas, sliced for topping
Instructions
Crush vanilla wafers with a food processor or rolling pin.
Mix crushed wafers with melted butter until dough forms.
Press dough firmly into a 9×13-inch pan.
Whisk pudding mix with milk until thickened.
Fold in mashed bananas and 1/2 cup whipped topping.
Spread mixture over crust, smoothing surface.
Layer banana slices on top, then spread remaining whipped topping.
Chill for 4 hours or overnight before slicing into bars.
Notes
Use halal-approved pudding mix and whipped topping.
Refrigerate leftovers for up to 3 days.
Optional: Sprinkle cinnamon or sprinkle on top for decoration.
- Prep Time: 20
- Category: No-Bake Creamy Desserts
- Method: No-Bake
- Cuisine: American
- Diet: Vegetarian
Nutrition
- Serving Size: 1 bar (1/16 of pan)
- Calories: 240
- Sugar: 18g
- Sodium: 160mg
- Fat: 10g
- Saturated Fat: 5g
- Carbohydrates: 30g
- Fiber: 1g
- Protein: 3g
- Cholesterol: 30mg