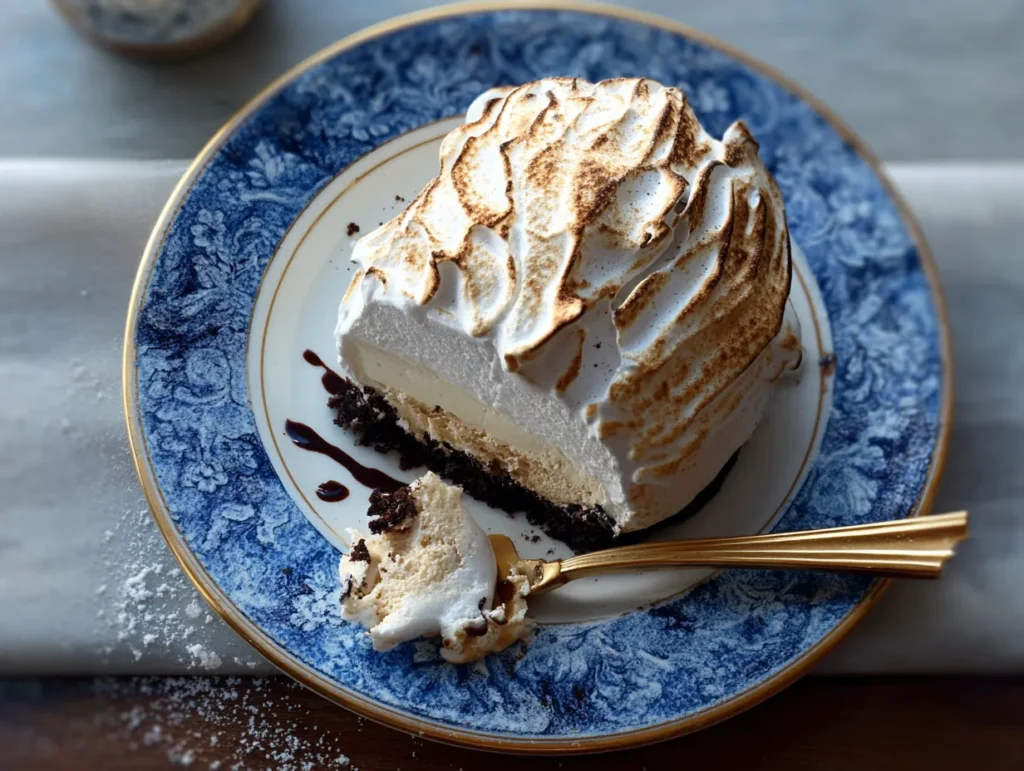
A slice of frozen delight ready to impress any guest
I’ll never forget the first time I made a baked Alaska for a New Year’s dinner — it was the showstopper that had everyone talking. But when you love tiramisu as much as I do, you start to wonder: what if we combined the bold flavors of espresso-soaked ladyfingers and creamy mascarpone with the drama of a toasted meringue dome? That’s how this Tiramisu Baked Alaska came to life — a mash-up of two beloved desserts, elevated yet accessible.
This dessert features a chewy brownie base, coffee ice cream, vanilla bean mascarpone cream, and crisp coffee-dipped ladyfingers — all wrapped in silky Swiss meringue and torched until golden. It looks extravagant, but with smart shortcuts and make-ahead options, it’s surprisingly doable.
Whether you’re hosting the holidays, looking for a memorable birthday finale, or craving a coffee ice cream dessert that breaks the mold, this recipe delivers. Plus, it keeps well in the freezer, making it perfect for prep-ahead entertaining.
We’ll walk you through every step, from ingredients to meringue magic. As always, we keep USDA food safety in mind when working with raw egg whites in meringue. For more safety info, check the USDA official guidelines.
Origins & Fusion: Why Tiramisu Baked Alaska Works So Well
The history behind a fusion dessert
The Tiramisu Baked Alaska may sound like a modern invention, but it’s really a celebration of two timeless classics. Tiramisu is a layered Italian dessert that originated in the 1960s in Treviso. Made with coffee-soaked ladyfingers, mascarpone, and cocoa, it’s a comfort dish that has been reimagined in countless ways — from classic tiramisu recipes to creative spins like matcha tiramisu.
Baked Alaska, on the other hand, dates back to the 19th century. Its key characteristic? Frozen layers of ice cream and cake wrapped in meringue and flambéed or toasted just before serving. The contrast of hot and cold is what makes it unforgettable.
Bringing the two together creates a dessert that’s both nostalgic and impressive. It offers the layered holiday dessert wow factor with the coffee-forward indulgence of Tiramisu Baked Alaska made even richer with brownie instead of ladyfingers at the base.
Why it works: flavor, texture, visual appeal
Let’s break it down. Each layer in this Tiramisu Baked Alaska plays a role:
Brownie Base: Provides a rich, chewy structure that holds up to freezing. You can use homemade or a quality boxed mix like we do in our easy brownie base.
Coffee Ice Cream: Intensifies the espresso notes, enhancing the Tiramisu Baked Alaska experience. It replaces the traditional zabaglione, keeping things simple and cold-friendly. It’s a must-have in any coffee ice cream dessert.
Mascarpone Vanilla Layer: Creamy and lightly sweet, this layer mimics tiramisu’s signature richness. Blending softened vanilla bean ice cream with mascarpone gives it a homemade touch without extra prep.
Soaked Ladyfingers: Dipped in coffee (with optional Grand Marnier), they add soft, spongy texture between the frozen elements. It’s a nod to tradition, while keeping the center unique.
Swiss Meringue Topping: The silky, stable finish. It browns beautifully with a torch and locks in the cold center — a true Swiss meringue topping that makes this dish dramatic and delicious.
The end result is a dessert that feels like a winter wonderland centerpiece, but still grounded in familiar comfort food vibes. Think of it as tiramisu’s fancy cousin who shows up at the party dressed in snow-white meringue and ready to impress.
Ingredients & Preparation Steps: Building the Tiramisu Baked Alaska, Layer by Layer
All the ingredients for your frozen tiramisu masterpiece
Creating a Tiramisu Baked Alaska might sound ambitious, but once you break it into manageable steps, it becomes a fun and rewarding kitchen project. Each layer contributes to the final masterpiece — from the rich brownie base to the toasty Swiss meringue topping.
Before you start, make sure you have a loaf pan (8×4″), parchment paper, plastic wrap, and a kitchen torch. Then, gather your ingredients and let’s get baking.
A. Gather Your Ingredients Accuracy Matters
To ensure optimal results and USDA-safe handling, use a kitchen scale where possible and follow these exact measures:
For the Brownie Base:
1 large egg
¾ cup (150 g) granulated sugar
1 tsp vanilla extract
¼ cup (50 g) neutral oil (canola, sunflower)
½ cup (60 g) all-purpose flour
¼ cup (21 g) unsweetened cocoa powder
½ tsp kosher salt
For the Filling:
½ cup (120 ml) strong black coffee, cooled
3 tbsp Grand Marnier (or substitute with coffee + hazelnut or vanilla syrup)
If you’re unsure about egg safety, consult the USDA egg handling guide — especially for recipes involving raw or lightly cooked whites.
This combination results in a frozen Tiramisu Baked Alaska that’s indulgent yet balanced, with contrasting textures in every bite.
B. Step-by-Step Preparation Start to Finish
1. Bake the Brownie Base
Preheat your oven to 325°F (163°C) and position the rack in the center. Line an 8×4″ loaf pan with parchment paper.
In a medium bowl, whisk together the egg, sugar, and vanilla until light and foamy. This aeration gives your brownie a tender but chewy texture.
Add the oil, then stir in the flour, cocoa, and salt. Mix until fully combined.
Spread the batter into the prepared pan and bake for about 18 minutes, or until the edges are set but the center is still slightly underdone — this keeps the brownie soft after freezing.
Let the brownie cool fully, then lift it out using the parchment and set aside.
Related: If you’re looking for a shortcut, try our easy brownie base guide.
2. Assemble the Ice Cream Layers
Line the same loaf pan with plastic wrap, leaving plenty of overhang.
In a bowl, gently blend the softened vanilla bean ice cream with mascarpone using a spatula or hand mixer. This forms your mascarpone ice cream layer. Spread it into the bottom of the pan. If it seems too soft, freeze for 30 minutes.
Mix coffee and Grand Marnier in a shallow dish. Quickly dip each ladyfinger and lay them over the vanilla layer. Return to freezer for 10 minutes if needed.
Now spread the softened coffee ice cream over the ladyfingers and smooth it out evenly.
Top with the brownie (trim if needed) and press gently so it adheres. Fold over the plastic wrap and freeze for at least 4 hours, preferably overnight.
Place the egg whites, sugar, and salt in a heatproof bowl or stand mixer bowl.
Set over a pot of simmering water (the bowl shouldn’t touch the water). Whisk constantly until the mixture reaches 160°F (71°C), or until you feel no sugar grains when rubbing it between your fingers.
Transfer the bowl to your stand mixer. Beat on medium until soft peaks form, then increase to high and whip until stiff, glossy peaks develop (5–7 minutes). Your Swiss meringue topping is now ready.
See how we stabilize our meringue perfectly in this Swiss meringue guide.
4. Final Assembly and Torch Finish
Unmold the frozen loaf onto a serving platter and peel off the plastic wrap.
Dollop and spread the meringue over the entire surface in dramatic swoops — don’t be shy, it’s part of the show.
Use a kitchen torch to toast the meringue until it turns golden brown. Alternatively, you can bake it for 2–3 minutes in a hot oven (450°F), but watch carefully.
Serve immediately or return to the freezer until ready to impress.
Love bold finishes like this? Try our ube tiramisu for another dramatic dessert.
Layer by layer: building the perfect frozen tiramisu core
Pro Tips, Creative Variations & Make-Ahead Strategy
The magic of a Tiramisu Baked Alaska lies not only in its stunning presentation but also in how adaptable it can be. Whether you’re preparing it for a holiday celebration, a weekend gathering, or a frozen make-ahead dessert, this recipe delivers elegance, convenience, and bold flavor. Below, we break down expert tips, flavor variations, and make-ahead tricks to help you perfect this showstopper — all while staying true to the heart of Tiramisu Baked Alaska.
A. Pro Tips for a Seamless Assembly
1. Use just-softened ice cream Let the ice cream soften for about 10–15 minutes at room temperature. If it melts too much, it will refreeze with icy crystals and lose its creaminess.
2. Whip a stable meringue Swiss meringue is inherently stable, but beat it until glossy stiff peaks form and the mixing bowl is completely cool. This gives you beautiful swoops like those seen in our Tiramisu Layer Cake.
3. Dip ladyfingers quickly Dip them for just 1–2 seconds in the coffee soak. Oversoaked biscuits break down or freeze too hard.
4. Freeze between layers For clean slices and well-defined structure, freeze each layer before adding the next — just like we do in our Ice Cream Tiramisu Cake.
5. Slice with a hot knife Dip a sharp knife in hot water, wipe dry, and slice. You’ll get perfect cuts even with frozen layers.
1. Switch up the base Instead of brownie, try a chocolate sponge or pound cake base. That’s the base inspiration behind our Tiramisu Cupcakes perfect for individual servings.
2. Play with ice cream flavors
Pistachio & mascarpone gives a nutty richness, like in our Pistachio Tiramisu.
Chocolate and espresso swirl offers a bold flavor, similar to our Chocolate Tiramisu.
Want something colorful? Try ube for a purple twist, as seen in the Ube Tiramisu.
3. Infuse the mascarpone Try adding a touch of cinnamon or instant coffee to your mascarpone layer — a trick that works beautifully in our Matcha Tiramisu, where bold flavors meet gentle creaminess.
4. Go alcohol-free If you’re skipping alcohol, replace Grand Marnier with vanilla syrup or orange extract. This keeps the dessert family-friendly without sacrificing depth.
5. Add crunch between layers Chopped roasted nuts or crushed chocolate-covered espresso beans can be layered in for texture. We love this idea in our Classic Tiramisu Recipe, where textural balance is key.
C. Make-Ahead Tips That Actually Work
1. Prepare up to 2 days in advance Once assembled, the entire dessert — meringue included — can be stored in the freezer for up to 48 hours. Swiss meringue holds up perfectly, as proven in our mainstay Tiramisu Cake.
2. Wrap it properly Use two layers: plastic wrap followed by foil. Store it at the back of your freezer where the temperature is most stable.
3. Torch now or later? You can torch the meringue before freezing, or wait and torch it just before serving.
Torch-before = convenient
Torch-after = dramatic finish
4. Serve from frozen Let the dessert sit for 5–7 minutes before slicing. This allows just enough softness for the knife to glide through without compromising shape.
5. Refreeze leftovers Slice and freeze extra servings in airtight containers for up to 3 more days. They’ll remain delicious and visually intact.
For another freezer-friendly favorite, check out our Ice Cream Tiramisu Cake, which follows the same layered frozen format.
D. EEAT + USDA Guidance for Safe, Trusted Results
This recipe follows culinary best practices — balancing flavor, structure, and food safety. The Swiss meringue is cooked to 160°F (71°C), making it safe for consumption when properly handled. Always use pasteurized eggs and consult the USDA food safety site for up-to-date guidelines.
Every tip, variation, and recommendation here stems from our hands-on testing of layered and tiramisu-based desserts — like our Tiramisu Cake and its flavor-forward spin-offs including Chocolate Tiramisu and Matcha Tiramisu.
Step-by-step recipe card for flawless Tiramisu Baked Alaska
Nutrition, Smart Questions & Serving Tips
A well-built dessert isn’t just about taste—it’s about knowing what you’re serving and how to do it confidently. This section breaks down nutritional considerations, answers popular user questions, and shares the best tips for plating your Tiramisu Baked Alaska like a pro.
Nutrition at a Glance
While indulgent, this dessert offers rich satisfaction in small portions—ideal for gatherings or celebratory meals.
Nutritional Information (Per Slice 1/12 of Cake)
Nutrient
Amount
Calories
310 kcal
Sugar
22 g
Fat
18 g
Saturated Fat
9 g
Carbohydrates
30 g
Protein
5 g
This dessert is rich—made with mascarpone, brownies, and ice cream—so a little goes a long way. For nutrition-conscious bakers, you can explore lightened-up versions such as the Matcha Tiramisu or Pistachio Tiramisu, which use naturally lower-sugar profiles.
Always use pasteurized eggs and high-quality dairy. Follow USDA food safety guidelines when preparing meringue-based desserts.
FAQ
1. Can you make Tiramisu Baked Alaska ahead of time?
Yes! You can prepare the entire dessert—including the meringue—up to 2 days in advance. Store it in the freezer in an airtight wrap, then torch the meringue just before serving for a dramatic finish. This method is used in our Ice Cream Tiramisu Cake.
2. What’s the best substitute for Grand Marnier in this recipe?
For a non-alcoholic version, substitute Grand Marnier with a mix of strong brewed coffee and a few drops of orange extract or vanilla syrup. It mimics the flavor while keeping it family-friendly. Try this technique in our Classic Tiramisu.
3. Can I use store-bought brownies instead of homemade?
Absolutely. If you’re short on time, high-quality store-bought brownies or brownie mix work beautifully. This shortcut has been tested in our Tiramisu Cupcakes.
4. How do I get the meringue to hold its shape?
Use the Swiss meringue method and beat until stiff, glossy peaks form. If done correctly, it will hold shape even when frozen. We follow this process step-by-step in our Tiramisu Layer Cake.
A dramatic and delicious frozen dessert, this Tiramisu Baked Alaska layers coffee-soaked ladyfingers, mascarpone ice cream, and brownies under a toasted Swiss meringue shell.
Total Time:8 hours 25 minutes
Yield:10 to 12 servings 1x
Ingredients
Scale
For the Brownie Base:
1 large egg
3/4 cup (150g) granulated sugar
1 tsp vanilla extract
1/4 cup (50g) neutral oil
1/2 cup (60g) all-purpose flour
1/4 cup (21g) cocoa powder
1/2 tsp kosher salt
For the Filling:
1/2 cup strong black coffee
3 tbsp orange extract (or Grand Marnier alternative)
1 pint vanilla bean ice cream, softened slightly
1/2 cup (4 oz) mascarpone cheese
1 pint coffee ice cream, softened slightly
6–8 ladyfingers
For the Swiss Meringue:
4 egg whites (120g)
1 cup (198g) granulated sugar
Pinch of kosher salt
Instructions
1. Bake the brownie base: Preheat oven to 325°F (163°C). Line an 8×4 inch loaf pan with parchment paper. Mix egg, sugar, and vanilla until fluffy. Add oil, flour, cocoa, and salt. Bake for 18 minutes. Cool completely.
2. Line the loaf pan with plastic wrap. Mix mascarpone with softened vanilla ice cream. Spread as bottom layer.
3. Dip ladyfingers in coffee + orange extract. Layer on top of mascarpone ice cream. Freeze 30 minutes.
4. Spread softened coffee ice cream over ladyfingers. Top with brownie layer. Press gently. Wrap and freeze at least 4 hours.
5. Make Swiss meringue: Combine egg whites, sugar, and salt in a heatproof bowl. Heat over simmering water, whisking until 160°F or sugar is fully dissolved. Whip until glossy, stiff peaks form.
6. Unmold dessert. Spread meringue over all sides. Torch until golden. Serve immediately.
Notes
For a more intense coffee flavor, add instant espresso powder to the mascarpone layer.
Use store-bought brownie or brownie mix to save time.
Torching can be done before or after freezing.
Author:Tiramisu Cake
Prep Time:25 minutes
Cook Time:8 hours (freezing time)
Category:Dessert
Method:No Bake, Frozen
Cuisine:Italian-American
Nutrition
Serving Size:1 slice
Calories:310
Sugar:22g
Sodium:120mg
Fat:18g
Saturated Fat:9g
Unsaturated Fat:7g
Trans Fat:0g
Carbohydrates:30g
Fiber:1g
Protein:5g
Cholesterol:60mg
Conclusion A Tiramisu Like No Other
If you love tiramisu, this Tiramisu Baked Alaska is your next must-try. It fuses the familiar espresso-soaked layers of ladyfingers and mascarpone with rich ice cream and a stunning meringue exterior. This recipe offers all the indulgence of the classic dessert, reimagined in a frozen, torch-kissed format.
We love how this version echoes the essence of our Tiramisu Cake, but with the frozen elegance of our Ube Tiramisu. It’s a visual stunner, a flavor bomb, and a practical make-ahead option—ideal for any celebration.
Whether you’re hosting a holiday dinner or simply want a slice of something extraordinary from your freezer, this dessert delivers. Small portions go a long way, and you’ll leave your guests with a memory they won’t forget.
From our kitchen to yours, we hope this Tiramisu Baked Alaska becomes a favorite you return to again and again. For more tiramisu innovations, check out our Chocolate Tiramisu and All Tiramisu Dessert Recipes.