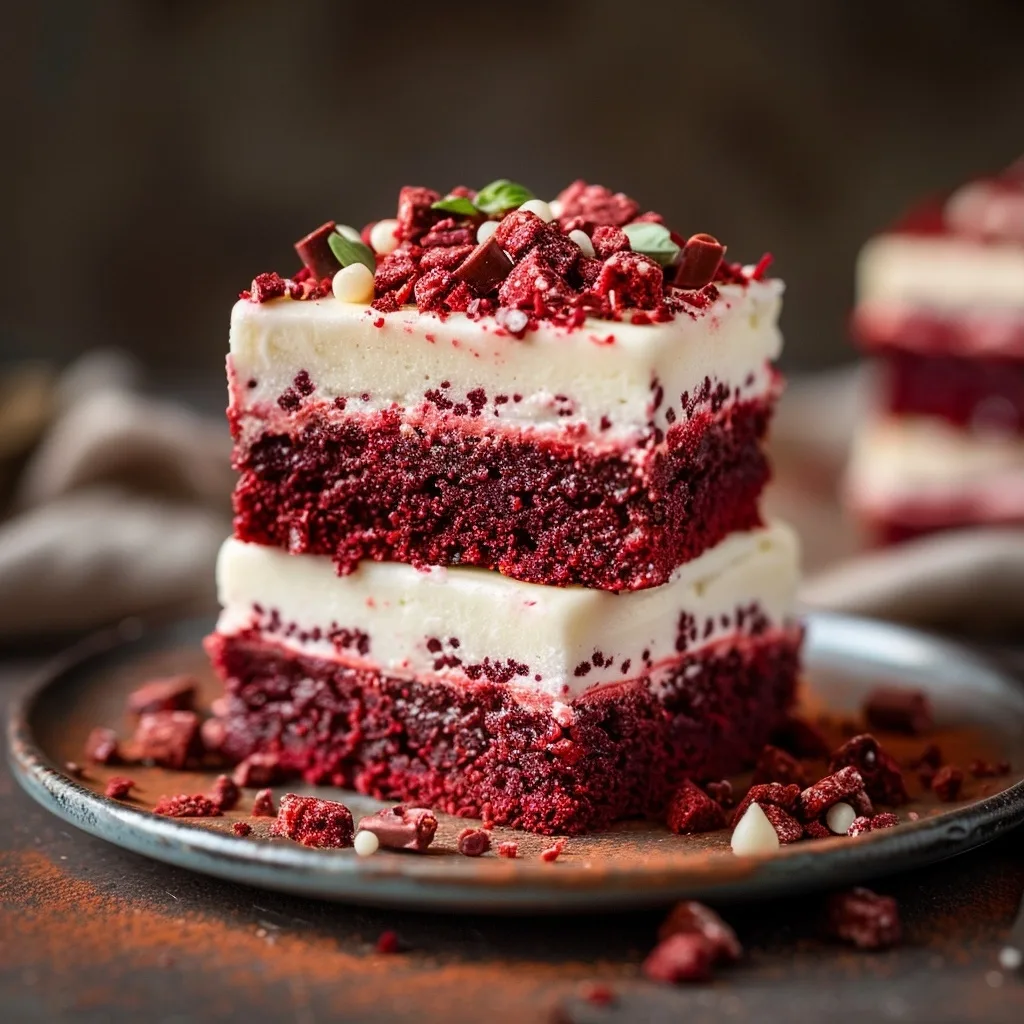
Red Velvet Cookie Bars, soft Lofthouse style, deliver a decadent yet easy-to-make treat. These bars capture the beloved red velvet essence with a tender, chewy cookie base. They offer a delightful alternative to traditional cookies, perfect for sharing at gatherings or enjoying as a personal indulgence. This recipe results in consistently delicious bars everyone will adore.

Recipe Overview
| Prep Time | Cook Time | Total Time | Servings | Difficulty | Cuisine |
|---|---|---|---|---|---|
| 20 minutes | 25 minutes | 45 minutes (plus cooling) | 24 | Easy | American |
Why This Recipe Works
This recipe achieves the coveted soft, chewy texture of Lofthouse cookies by using a higher ratio of butter and sugar to flour, creating a tender crumb. The inclusion of cream cheese frosting provides that signature sweet tang that complements the subtle cocoa notes of the red velvet base. We’ve found that using gel food coloring is essential for achieving a vibrant red hue without altering the dough’s consistency. The simplicity of baking in a single pan makes for a much faster and less fussy baking experience compared to individual cookies.
The balance of ingredients is key; the baking soda reacts with the acidic elements to create lift, while the salt enhances all the flavors. Ensuring the butter is perfectly softened, not melted or too cold, guarantees the dough creams properly, incorporating air for a light texture. This methodical approach ensures that each batch of Red Velvet Cookie Bars turns out perfectly soft and flavorful, just like the best Lofthouse cookies.
Ingredients
| Ingredient | Quantity | Notes |
|---|---|---|
| Unsalted Butter, softened | 1 cup (2 sticks) | Ensure butter is truly softened, not melted, for best texture. Use high-quality butter for superior flavor. If substituting, use a vegan butter alternative for dairy-free needs. |
| Granulated Sugar | 1 ½ cups | Adjust slightly based on desired sweetness. Brown sugar can be added for extra chewiness. Light brown sugar acts similarly to granulated here. |
| Eggs | 2 large | Room temperature eggs incorporate better and create a more uniform dough. For egg-free, use a flax egg or commercial egg replacer. |
| Vanilla Extract | 2 teaspoons | Pure vanilla extract enhances overall flavor. Almond extract can be added for a different flavor profile. |
| Red Gel Food Coloring | 1-2 tablespoons | Gel coloring provides vibrant color without thinning batter. Adjust to achieve desired shade. Natural beet powder can be used but will alter flavor and color intensity. |
| Unsweetened Cocoa Powder | 2 tablespoons | Adds subtle chocolate notes characteristic of red velvet. Dutch-processed cocoa offers a smoother flavor. |
| All-Purpose Flour | 3 cups | Measure accurately by spooning and leveling into the measuring cup. Cake flour can be used for an even more tender crumb. Gluten-free all-purpose flour blend works well too. |
| Baking Soda | 1 teaspoon | Essential for leavening and texture. Ensure it is fresh for optimal lift. Aluminum-free baking soda is an option. |
| Salt | ½ teaspoon | Balances sweetness and enhances flavors. Sea salt or kosher salt are suitable choices. |
| Cream Cheese Frosting | For topping | Homemade or store-bought. See variations for options. A simple vanilla buttercream is also a good choice. Ensure it is firm enough to spread without melting. |
Step-by-Step Instructions
Prep the Pan and Oven
- Preheat oven to 350°F (175°C).
- Lightly grease a 9×13 inch baking pan or line it with parchment paper, leaving an overhang for easy lifting.
Combine Wet Ingredients
- Cream together the softened unsalted butter and granulated sugar in a large bowl until light and fluffy. This process incorporates air, contributing to the bar’s tender crumb.
- Beat in the eggs one at a time, ensuring each is fully incorporated before adding the next.
- Follow with the vanilla extract, mixing until combined.
- Add the red gel food coloring and unsweetened cocoa powder to the wet ingredients.
- Mix until the color is uniform and vibrant. Start with 1 tablespoon of food coloring and add more until the desired shade is achieved.
Combine Dry Ingredients
- In a separate medium bowl, whisk together the all-purpose flour, baking soda, and salt. This ensures the dry ingredients are evenly distributed.
Combine Wet and Dry Ingredients
- Gradually add the dry ingredients to the wet ingredients, mixing on low speed until just combined.
- Be careful not to overmix, as this can lead to tough bars. Stop mixing as soon as streaks of flour disappear.
Form and Bake the Bars
- Spread the dough evenly into the prepared 9×13 inch baking pan. The dough will be thick.
- Use a spatula or your hands lightly greased with non-stick spray to press it into an even layer. This ensures even baking.
- Bake for 20-25 minutes, or until the edges are set and a toothpick inserted into the center comes out with a few moist crumbs attached.
- Avoid overbaking to maintain a soft texture. A slightly underbaked center is preferable for ultimate chewiness.
Cool and Frost
- Let the bars cool completely in the pan on a wire rack. This is crucial for them to set properly before frosting.
- Once cooled, prepare your cream cheese frosting.
- Spread the frosting evenly over the cooled red velvet bars. Use an offset spatula for a smooth finish.
Serve
- Cut the frosted bars into squares or rectangles.
- For cleaner cuts, use a large knife and wipe it clean between slices.
- Serve and enjoy these delectable Red Velvet Cookie Bars, soft Lofthouse style.
Chef Tips for Perfect Results
- Proper Butter Softening: Butter should yield to gentle pressure but not be greasy or melted. This ensures optimal creaming for a tender texture.
- Accurate Flour Measurement: Spoon flour into your measuring cup and level it off with a straight edge. Scooping directly from the bag can compact the flour, leading to dry bars.
- Avoid Overmixing: Mix the dough until just combined after adding the dry ingredients. Overmixing develops gluten, resulting in tough, chewy bars rather than soft ones.
- Gel Food Coloring is Key: Use gel food coloring for the most vibrant red hue without adding excess liquid, which can affect the dough consistency.
- Cooling is Crucial: Allow the bars to cool completely in the pan before frosting. Warm bars will melt the frosting, creating a messy finish.
- Even Spreading: Ensure the dough is spread into an even layer in the pan for consistent baking. Use a greased spatula or lightly floured hands.
Common Mistakes to Avoid
- Using Melted Butter: Melted butter leads to greasy, flat bars with a dense texture. Always use softened butter that creams properly with sugar.
- Overbaking the Bars: Overbaking dries out the bars, removing their characteristic soft and chewy quality. Bake until the edges are set and a toothpick has moist crumbs, not clean.
- Measuring Flour Incorrectly: Packing too much flour into the measuring cup results in dry, crumbly bars. Always use the spoon and level method.
- Adding Frosting Too Soon: Frosting warm bars causes the frosting to melt and slide off. Patience is required; allow bars to cool fully before applying any topping.
- Skipping the Salt: Salt is essential for balancing sweetness and enhancing all the other flavors. Omitting it results in a bland, overly sweet cookie bar.
Variations and Substitutions
| Ingredient | Substitution | Impact on Flavor |
|---|---|---|
| Cream Cheese Frosting | Vanilla Buttercream Frosting | Less tang, sweeter profile. Maintains a classic sweet topping. |
| Cream Cheese Frosting | Chocolate Ganache Drizzle | Richer chocolate flavor, less sweetness than traditional frosting. |
| Red Gel Food Coloring | Natural Beet Powder | Milder color, potential for slight earthy flavor notes. Requires more product for similar intensity. |
| All-Purpose Flour | Gluten-Free All-Purpose Flour Blend | Texture may vary slightly depending on the blend used. Ensure it contains xanthan gum. |
| Unsalted Butter | Vegan Butter Alternative | Dairy-free option. Flavor profile is generally comparable. |
Serving Suggestions and Pairings
These Red Velvet Cookie Bars are perfect for any celebration, from birthday parties to holiday gatherings. They make a wonderful addition to a dessert buffet or potluck spread. Serve them alongside a tall glass of cold milk for a classic combination. A cup of hot coffee or a refreshing sparkling cider also complements their rich flavor beautifully. For a special occasion, pair them with fresh berries. These bars are a guaranteed crowd-pleaser for parties and casual get-togethers.
Storage and Reheating
| Method | Duration | Instructions |
|---|---|---|
| Room Temperature Storage | 2-3 days | Store in an airtight container after cooling completely. Frosting should be firm. |
| Refrigerated Storage | 5-7 days | Place in an airtight container. This is recommended if your frosting is soft or if the climate is very warm. |
| Freezing (Unfrosted) | Up to 2 months | Cool completely, cut into bars, wrap tightly in plastic wrap, then aluminum foil. Thaw at room temperature before frosting. |
| Freezing (Frosted) | Up to 1 month | Freeze bars in a single layer on a baking sheet until firm, then transfer to an airtight container. Thaw slowly in the refrigerator overnight. |
Nutritional Information
| Nutrient | Amount per Serving |
|---|---|
| Calories | Approximate values. |
| Protein | Approximate values. |
| Fat | Approximate values. |
| Carbohydrates | Approximate values. |
| Fiber | Approximate values. |
| Sugar | Approximate values. |
| Sodium | Approximate values. |
Frequently Asked Questions
Can I substitute the food coloring?
Yes, you can substitute natural beet powder for red gel food coloring. The color intensity may be less vibrant, and slight earthy notes might be introduced. Adjust the amount of beet powder until your desired color is achieved.
How do I know when the bars are done baking?
Bake the bars until the edges appear set and lightly golden. A toothpick inserted into the center should come out with moist crumbs attached, not wet batter. This indicates they are perfectly baked for a soft texture.
My bars are tough, what went wrong?
Toughness typically results from overmixing the dough after adding the flour or overbaking the bars. Ensure you mix only until combined and pull them from the oven when they appear slightly underbaked in the center.
Can I make these Red Velvet Cookie Bars ahead of time?
Yes, these bars can be made ahead of time. They store well at room temperature or in the refrigerator for several days. Ensure they are fully cooled before frosting and storing.
What is the best way to cut these bars?
For clean cuts, use a large, sharp knife and wipe it clean with a damp cloth between each cut. For perfectly uniform bars, measure your cuts carefully. A bench scraper can also be effective for slicing.
These Red Velvet Cookie Bars, soft Lofthouse style, are a delightful creation that brings joy with every bite. They perfectly balance the classic red velvet charm with an irresistibly tender texture. Whether for a special event or a simple craving, these bars are sure to impress. Embrace the ease of this recipe and savor the signature creamy sweetness. Enjoy your homemade cookie bar masterpiece.
Print
Red Velvet Cookie Bars Soft Lofthouse Style
Decadent, soft red velvet bars with a creamy cream cheese twist. This Lofthouse-style recipe uses a high butter-to-flour ratio for a tender crumb and vibrant red hue, perfect for gatherings or personal indulgence.
- Total Time: 45
- Yield: 24 bars
Ingredients
Unsalted Butter, softened
Granulated Sugar
Eggs
Vanilla Extract
All-Purpose Flour
Cocoa Powder
Gel Food Coloring
Buttermilk
Baking Soda
Salt
Cream Cheese (for cream cheese frosting)
Powdered Sugar
Semi-Sweet Chocolate Chips (optional)
Instructions
Preheat oven to 350°F (175°C). Line a 13×9-inch pan with parchment paper.
In a bowl, cream 1 cup softened butter and 1.5 cups granulated sugar until light and fluffy.
Add 2 large eggs and 2 teaspoons vanilla extract, mixing well.
In another bowl, whisk 2.25 cups all-purpose flour, 1/2 cup cocoa powder, 1 tsp baking soda, and 1/2 tsp salt.
Gradually add dry ingredients to the wet mixture until combined.
Fold in 2 tsp gel food coloring and 2 Tbsp buttermilk. Chill dough 15 minutes if too soft.
Press dough evenly into prepared pan. Bake for 20-22 minutes or until golden.
For frosting: Beat 8 oz cream cheese and 1/2 cup softened butter until smooth. Gradually add 3 cups powdered sugar and 1 tsp vanilla. Spread over cooled bars. Optional: Press chocolate chips onto frosting before setting.
Notes
Use gel food coloring for vibrant color without altering dough. Substitute vegan butter/cream cheese for dairy-free. Chill dough if sticky. For egg-free, use 2 flax eggs (60g ground flaxseed + 6 Tbsp water). Frosting can be halved for less sweetness. Store in airtight container for 3 days or freeze layers separately.
- Prep Time: 20
- Cook Time: 22
- Category: Cake Recipes & Easy Baking Ideas
- Method: Baking
- Cuisine: American
- Diet: Halal
Nutrition
- Serving Size: 1 bar
- Calories: 320
- Sugar: 35g
- Sodium: 300mg
- Fat: 16g
- Saturated Fat: 9g
- Carbohydrates: 42g
- Fiber: 1g
- Protein: 3g
- Cholesterol: 40mg