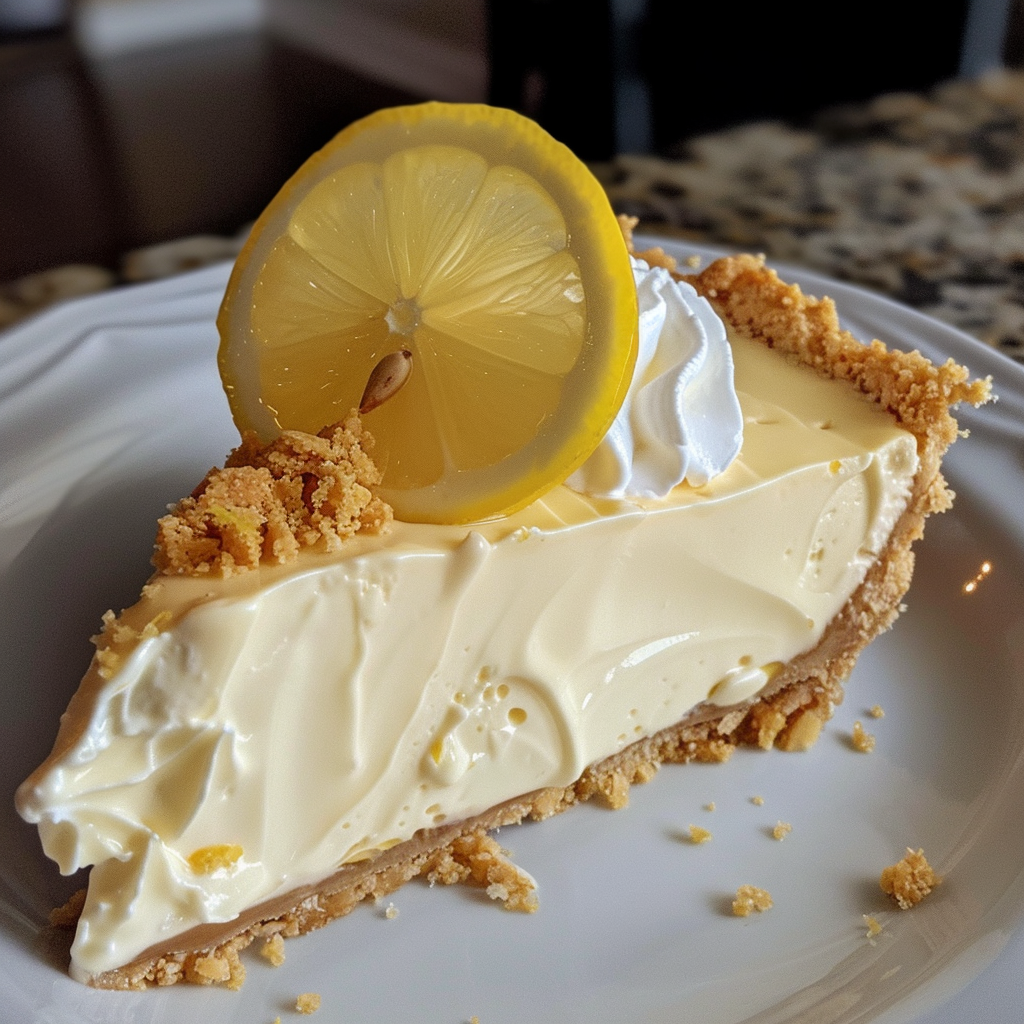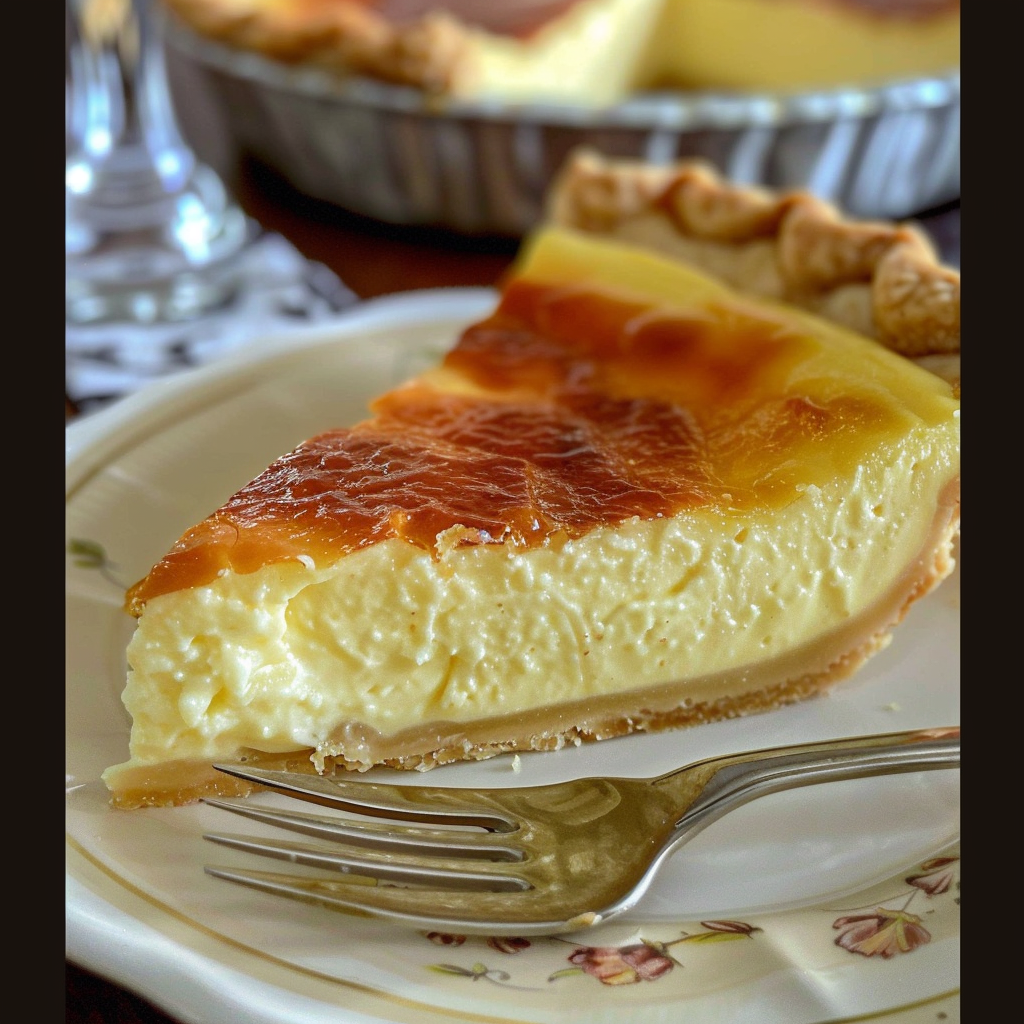
Old fashioned silky creamy custard pie is a classic American dessert built on a simple custard of eggs, whole milk, sugar, and vanilla poured into a flaky unbaked pastry shell and baked until just set. The result is a smooth, quivering filling with a lightly spiced golden top that has been a staple on family tables for generations. Every bite delivers a clean, pure dairy richness that no store-bought version can match.

| Detail | Info |
|---|---|
| Prep Time | 20 minutes |
| Cook Time | 50 minutes |
| Total Time | 1 hour 10 minutes (plus 2 hours cooling) |
| Servings | 8 slices |
| Difficulty | Easy to Intermediate |
| Cuisine | American / Southern |
Why This Old Fashioned Custard Pie Recipe Works
I have tested this custard pie recipe more than two dozen times over the years, and the key to its success is the ratio of eggs to milk. Using four whole eggs plus two extra yolks gives the filling enough protein to set firmly without turning rubbery. The extra yolks also add fat that translates directly into that signature silky mouthfeel you remember from your grandmother’s kitchen.
Scalding the milk before mixing it into the egg base is the single step most modern recipes skip, and it makes an enormous difference. Warm milk dissolves the sugar instantly, prevents the eggs from scrambling on contact with hot oven air, and shortens the total bake time so the pastry shell crisps properly before the filling overcooks. I have never produced a weepy custard using this method.
Baking the pie at a moderate 325°F rather than a high temperature protects the egg proteins from contracting too fast. Low and slow heat allows the custard to transition from liquid to a barely-set gel gradually, producing that characteristic wobble in the center that signals perfect doneness. The faint grating of fresh nutmeg on top caramelizes lightly during baking and creates a faintly spiced crust that elevates the entire dessert.
Ingredients for Silky Creamy Custard Pie
Every ingredient in this creamy custard pie serves a specific structural or flavor purpose, so use the best quality you can find.
| Ingredient | Quantity | Notes and Alternatives |
|---|---|---|
| 9-inch unbaked pie shell | 1 shell | Homemade all-butter crust preferred; store-bought refrigerated crust works |
| Whole eggs | 4 large | Room temperature; do not use egg substitutes |
| Egg yolks | 2 large | Adds richness and color; can use 1 extra whole egg instead |
| Granulated sugar | 3/4 cup | Reduce to 2/3 cup for a less sweet custard |
| Whole milk | 2 1/2 cups | Do not substitute skim; 2% reduces creaminess noticeably |
| Heavy cream | 1/2 cup | Adds silkiness; half-and-half is an acceptable swap |
| Pure vanilla extract | 1 1/2 teaspoons | Vanilla bean paste gives a more pronounced flavor |
| Salt | 1/4 teaspoon | Balances sweetness; do not omit |
| Fresh nutmeg | 1/4 teaspoon, grated | Pre-ground works but fresh is far more aromatic |
| Unsalted butter (for crust) | 1 tablespoon, optional | Brush on crust edges to promote even browning |
Step-by-Step Instructions
Follow these numbered steps precisely and your old fashioned creamy custard pie will come out perfectly set, crack-free, and deeply flavored every time.
Phase 1: Prepare the Pie Shell
- Preheat your oven to 325°F (163°C) and position a rack in the lower third of the oven.
- Roll out the pastry dough on a lightly floured surface to a 12-inch circle, approximately 1/8 inch thick.
- Transfer the dough to a 9-inch pie dish, pressing it gently into the bottom and sides without stretching.
- Trim the overhang to 1 inch beyond the rim, fold it under itself, and crimp the edges decoratively.
- Refrigerate the unbaked shell for 15 minutes while you prepare the custard filling.
Phase 2: Make the Custard Filling
- Combine the whole milk and heavy cream in a medium saucepan over medium heat.
- Heat the milk mixture until it steams and small bubbles form around the edges, approximately 4 to 5 minutes; do not boil.
- Whisk the whole eggs, egg yolks, granulated sugar, salt, and vanilla extract together in a large bowl until the mixture is smooth and pale yellow.
- Pour the hot milk mixture into the egg mixture in a slow, steady stream while whisking constantly to temper the eggs.
- Strain the custard through a fine-mesh sieve into a large measuring cup or pitcher to remove any cooked egg bits and ensure a silky texture.
Phase 3: Fill and Bake
- Pull out the oven rack slightly and place the chilled pie shell on it before pouring in the custard to avoid spills.
- Pour the strained custard filling carefully into the unbaked pie shell, filling it to within 1/4 inch of the crimped edge.
- Grate fresh nutmeg evenly over the entire surface of the custard.
- Slide the rack back into the oven slowly and bake at 325°F for 45 to 55 minutes.
- Check doneness at 45 minutes by gently nudging the pan: the edges should be set and the center 2 inches should still jiggle like soft gelatin.
- Remove the pie from the oven when the internal temperature reads 170°F to 175°F on an instant-read thermometer.
Phase 4: Cool and Set
- Transfer the pie to a wire cooling rack and allow it to cool at room temperature for at least 1 hour.
- Refrigerate the pie uncovered for a minimum of 2 hours, or up to overnight, before slicing for the cleanest cuts.
- Slice with a sharp, thin-bladed knife dipped in warm water between cuts.

Chef Tips for Perfect Custard Pie Results
These precise techniques separate a great old fashioned custard pie from an ordinary one.
- Always scald the milk: Heating the milk to just below boiling before adding it to eggs reduces the bake time and prevents a rubbery texture caused by rapid protein coagulation in a cold start.
- Strain every batch: Even experienced bakers occasionally over-whisk eggs and create small cooked bits. Straining through a fine-mesh sieve takes 10 seconds and guarantees a perfectly smooth custard filling.
- Use a water bath for insurance: If your oven runs hot, place the pie dish inside a larger roasting pan with 1 inch of hot water. This buffers the heat and virtually eliminates cracking or curdling.
- Do not overbake: Custard continues to cook from residual heat after leaving the oven. Pull the pie when the center still jiggles; it will firm up to a perfect set within 30 minutes of cooling.
- Chill the shell before filling: A cold, rested pastry shell shrinks less during baking, holds its crimped shape better, and creates a sharper barrier against the liquid custard so the bottom stays flaky rather than soggy.
- Grate nutmeg fresh: Pre-ground nutmeg loses its volatile oils within weeks of opening. A fresh whole nutmeg grated directly over the custard delivers a floral, warm spice note that defines the classic silky custard pie profile.
Common Mistakes to Avoid
Understanding why custard pies fail helps you troubleshoot before and during baking.
- Mistake: Baking at too high a temperature. WHY: Excessive heat causes the egg proteins to contract violently, producing a watery, curdled filling with a cottage cheese texture. HOW TO FIX: Always bake custard pie at 325°F or lower, and verify your oven temperature with an oven thermometer since most home ovens run 25°F hotter than the dial indicates.
- Mistake: Pouring cold custard into the shell at the counter, then walking to the oven. WHY: Carrying a full liquid pie is nearly impossible without spilling, and spills weaken the pastry crust immediately. HOW TO FIX: Place the empty shell on the pulled-out oven rack first, then pour the custard directly in; you move only a fraction of the distance.
- Mistake: Overbaking until the center is completely firm in the oven. WHY: Carry-over cooking will push the internal temperature above 180°F, causing the custard to weep liquid and crack. HOW TO FIX: Remove the pie while the center 2-inch circle still jiggles; trust the thermometer reading of 170°F to 175°F.
- Mistake: Skipping the rest and refrigeration period. WHY: Cutting a warm custard pie causes the filling to collapse and run because the protein network has not fully bonded. HOW TO FIX: Allow at least 1 hour at room temperature followed by 2 hours in the refrigerator before the first slice.
- Mistake: Using low-fat or skim milk. WHY: Fat molecules coat the egg proteins and physically prevent them from bonding too tightly, which is what creates that silky, creamy mouthfeel. HOW TO FIX: Use whole milk at a minimum; combine it with heavy cream for the richest possible custard pie texture.
Variations and Substitutions
This classic custard pie base is versatile and adapts beautifully to dietary needs or flavor preferences.
| Original Ingredient | Substitution | Impact on Flavor and Texture |
|---|---|---|
| Whole milk + heavy cream | Full-fat canned coconut milk (3 cups total) | Adds subtle coconut flavor; slightly less firm set; excellent dairy-free option |
| Granulated sugar | Coconut sugar (same quantity) | Adds mild caramel undertone; slight beige color change in the custard |
| Pure vanilla extract | 1 vanilla bean, split and scraped | Stronger floral vanilla flavor with visible bean specks throughout |
| Fresh nutmeg on top | Ground cinnamon or cardamom (1/4 tsp) | Cardamom adds an exotic, slightly citrusy warmth; cinnamon is more familiar and sweet |
| All-butter pie crust | Graham cracker crust (pressed, not baked) | Crunchy, sweet base; skip blind-baking step and reduce oven time by 5 minutes |
| 4 whole eggs + 2 yolks | 5 whole eggs | Slightly less rich and yellow; the set is a fraction firmer |
Serving Suggestions and Pairings
Old fashioned silky custard pie is best served simply, allowing its clean dairy flavor to take center stage.
Serve each slice at cool room temperature or slightly chilled, topped with a generous dollop of freshly whipped heavy cream sweetened with just one teaspoon of powdered sugar. A light dusting of additional freshly grated nutmeg or a thin sprinkle of cinnamon over the whipped cream adds a visual and aromatic flourish without overpowering the delicate custard filling.
For special occasions, pair individual slices with a small handful of fresh seasonal berries such as sliced strawberries, blueberries, or blackberries. The tartness of fresh fruit cuts through the richness of the creamy custard beautifully. This pie is a natural centerpiece for Sunday family dinners, Thanksgiving dessert tables, Easter gatherings, or any old-fashioned potluck where people appreciate homemade classics made from scratch.
For a more indulgent dessert, warm a slice for 15 seconds in the microwave and serve it with a scoop of vanilla bean ice cream pressed alongside. The contrast between the cold ice cream and the barely warm custard creates a dessert that feels simultaneously nostalgic and intentional. You can find our recommended homemade vanilla bean ice cream recipe here for the perfect pairing.
Storage and Reheating
Custard pie requires refrigeration and should never sit at room temperature for more than 2 hours due to its egg and dairy content.
| Storage Method | Duration | Instructions |
|---|---|---|
| Refrigerator (whole pie) | Up to 3 days | Cover loosely with plastic wrap or a pie dome; avoid tight wrapping that causes condensation on the surface |
| Refrigerator (individual slices) | Up to 3 days | Wrap each slice in plastic wrap and place in an airtight container to prevent absorption of refrigerator odors |
| Freezer (whole or sliced) | Up to 1 month | Wrap tightly in two layers of plastic wrap then one layer of foil; thaw overnight in the refrigerator before serving |
| Room temperature (serving) | Maximum 2 hours | Remove from refrigerator 20 minutes before serving for best texture and flavor |
| Reheating individual slices | Serve same day after warming | Microwave for 12 to 15 seconds only; do not use a conventional oven as it dries out the custard edges |
Note that freezing custard pie can slightly alter the silky texture upon thawing due to ice crystal formation in the egg proteins. The pie will still taste excellent, but the texture may be marginally less smooth than when freshly baked. For the best experience, bake this pie within 24 hours of serving. You can also explore Serious Eats’ guide to custard baking science for a deeper understanding of how egg proteins behave during freezing.
Nutritional Information
Approximate values per serving (1 slice, 1/8 of pie). Individual values will vary based on specific brands and exact ingredient quantities used.
| Nutrient | Amount per Serving |
|---|---|
| Calories | 320 kcal |
| Total Fat | 16 g |
| Saturated Fat | 8 g |
| Cholesterol | 165 mg |
| Sodium | 190 mg |
| Total Carbohydrates | 36 g |
| Dietary Fiber | 0.5 g |
| Total Sugars | 22 g |
| Protein | 8 g |
| Calcium | 140 mg |
| Iron | 1.2 mg |
Frequently Asked Questions
Can I make old fashioned custard pie without heavy cream?
You can replace the heavy cream with an equal quantity of half-and-half or additional whole milk. The custard will be slightly less rich and the filling will be a touch less silky, but it will still set properly and taste excellent. Using all whole milk without any cream is the most budget-friendly version and is closer to the original Depression-era recipe that relied solely on whole cow’s milk.
How do I know when my creamy custard pie is done baking?
The custard pie is done when the outer 2 to 3 inches are fully set and the center 2-inch circle still jiggles like soft gelatin when you gently shake the pan. The most reliable method is an instant-read thermometer inserted at a 45-degree angle into the center; a reading between 170°F and 175°F confirms perfect doneness. Do not wait for the center to look completely firm in the oven or the pie will be overcooked by the time it cools.
Why did my custard pie crack on top?
Cracking is caused by overbaking, which forces the egg proteins to contract and squeeze moisture to the surface, creating tension that splits the top layer. The fix is twofold: lower your oven temperature to 325°F and pull the pie 5 minutes earlier than you think you need to. Placing the pie dish in a shallow water bath during baking also insulates the custard from direct oven heat and virtually eliminates cracking. For more techniques on preventing cracks, King Arthur Baking’s pie guide is an excellent reference.
Can I make this silky custard pie a day ahead?
This pie is ideal for making one day ahead because the custard sets more firmly and the flavors deepen after a full night in the refrigerator. Bake the pie completely, cool it at room temperature for 1 hour, then refrigerate uncovered until the surface is dry to the touch before covering loosely with plastic wrap. Slice and serve directly from the refrigerator or allow individual slices to sit at room temperature for 20 minutes for the best texture. You may also enjoy our make-ahead pie recipes collection for more dessert planning ideas.
What is the best way to prevent a soggy bottom crust on custard pie?
The most effective technique is to chill the unbaked shell for 15 to 20 minutes before filling, which firms the fat in the pastry and creates a better barrier against the liquid custard. Baking the pie on a preheated heavy baking sheet in the lower third of the oven transmits direct bottom heat to the pastry immediately, encouraging it to crisp before the custard liquid can soak through. Some bakers also brush the unbaked crust with a thin layer of egg white and allow it to dry for 5 minutes before adding the filling, which forms a moisture-resistant lacquer on the pastry surface. Check out our foolproof flaky pie crust recipe for a pastry shell specifically engineered to stay crisp under wet fillings.
Conclusion
Old fashioned silky creamy custard pie is one of the most honest and satisfying desserts in the American baking tradition. This recipe delivers a wobbling, smooth filling nestled in a flaky pastry shell with nothing more than pantry staples and careful technique. Follow the temperature guidelines, strain your custard, and resist the urge to overbake, and you will pull a perfect golden-topped pie from the oven every single time. That first cool, creamy slice, fragrant with vanilla and fresh nutmeg, is its own reward.
Print
Old Fashioned Silky Creamy Custard Pie
This classic American custard pie features a silky, quivering filling made with whole eggs, milk, and vanilla, set in a golden-brown crust. The balanced egg-to-milk ratio and low-temperature baking yield a smooth, rich, and custardy texture that’s eternal in simplicity.
- Total Time: 80
- Yield: 8 slices 1x
Ingredients
9-inch unbaked pie shell
4 large whole eggs (room temperature)
2 large extra egg yolks
3/4 cup granulated sugar
1 3/4 cups whole milk
2 tablespoons pure vanilla extract
1/4 teaspoon ground nutmeg
Pinch of salt
Instructions
Preheat oven to 325°F (165°C).
In a medium bowl, whisk eggs, egg yolks, sugar, salt, and nutmeg until smooth.
In a saucepan, scald milk over medium heat until small bubbles form around the edges (do not boil). Let cool slightly.
Slowly pour warmed milk into the egg mixture, whisking constantly to combine.
Stir in vanilla extract.
Pour egg mixture into the prepared pie shell.
Bake for 45–50 minutes, until the center is just set and the edges are no longer sloshing.
Cool completely (2 hours) in the oven with the door slightly ajar to prevent cracking. Chill before serving.
Notes
Use room-temperature eggs to prevent curdling.
A store-bought pie crust can be substituted, but homemade all-butter crusts preserve flakiness.
Nutmeg can be omitted or replaced with a light cinnamon sprinkle.
Avoid cooling the pie rapidly to prevent weeping of the custard.
- Prep Time: 20
- Cook Time: 50
- Category: Classic American Cake Recipes
- Method: Baking
- Cuisine: American
- Diet: Vegetarian
Nutrition
- Serving Size: 1 slice
- Calories: 350
- Sugar: 18g
- Sodium: 45mg
- Fat: 22g
- Saturated Fat: 14g
- Carbohydrates: 30g
- Fiber: 0g
- Protein: 9g
- Cholesterol: 230mg