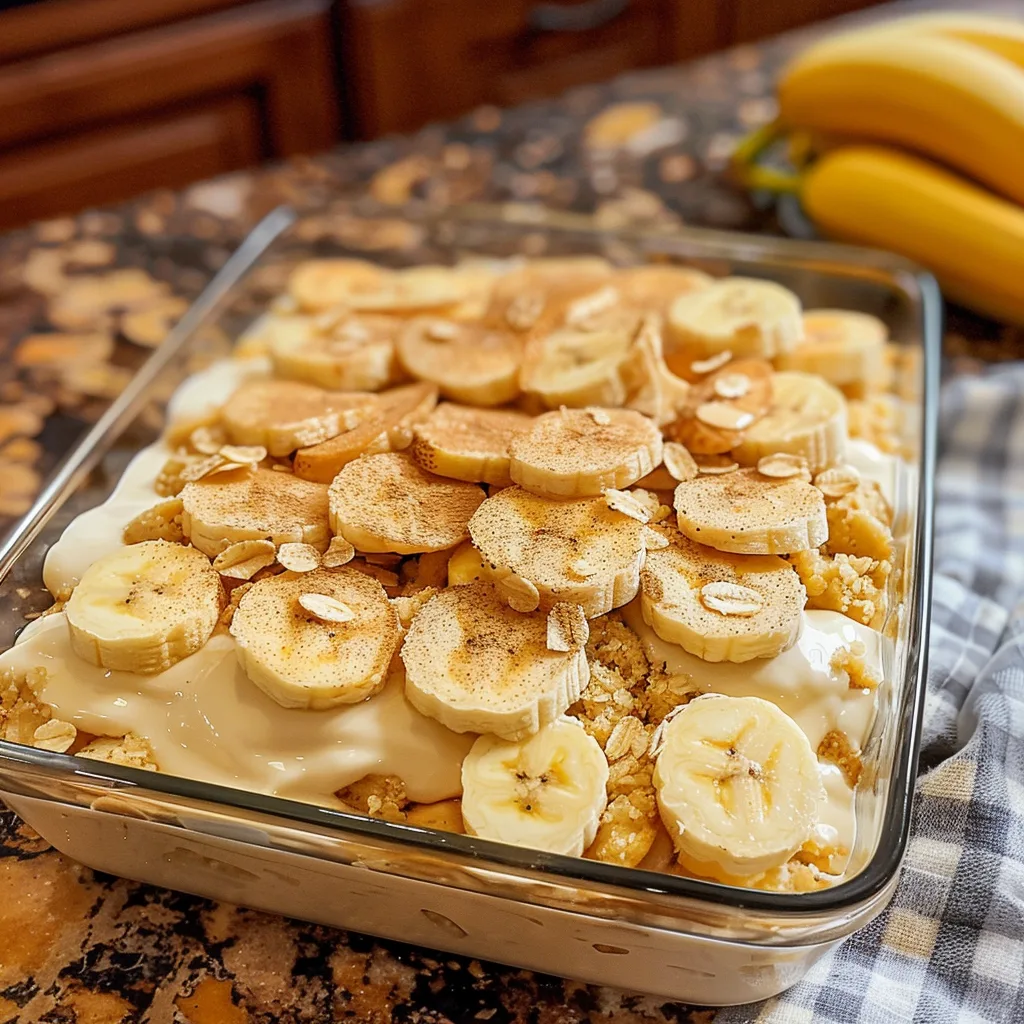
This old-fashioned homemade banana pudding delivers pure comfort and nostalgic flavor in every spoonful. It’s a timeless dessert, showcasing layers of sweet, ripe bananas nestled between delicate vanilla wafers and a rich, luscious vanilla bean custard. Topped with a cloud of perfectly browned meringue, this pudding is a true celebration of simple, wholesome ingredients transformed into something extraordinary. Get ready to rediscover a beloved classic.

Recipe Overview
| Prep Time | Cook Time | Total Time | Servings | Difficulty | Cuisine |
|---|---|---|---|---|---|
| 30 minutes | 30 minutes | 1 hour 30 minutes (plus chilling) | 8-10 servings | Medium | American |
Why This Recipe Works
The magic of this old-fashioned homemade banana pudding lies in its perfect balance of textures and temperatures. The creamy, slightly warm custard contrasts beautifully with the cool, soft bananas and the crisp vanilla wafers. When these elements meld together, they create a harmonious bite that is both satisfying and indulgent. I’ve found that using a good quality milk and incorporating the egg yolks carefully prevents any scrambled egg texture from developing. This method ensures a silky smooth pudding every time.
Achieving the perfect meringue crown is also key to this recipe’s rustic charm. It provides a delicate, airy sweetness that complements the richness of the custard without overpowering the star: the bananas. Properly aerating the egg whites and gradually adding sugar creates a stable meringue that browns beautifully in the oven. A slightly toasted top, with just a hint of crispness, elevates the entire dessert experience. This recipe has been perfected through many kitchens, ensuring a delightful outcome.
Ingredients
| Ingredient | Quantity | Notes |
|---|---|---|
| Ripe Bananas | 4-5 medium | Ensure they are ripe but not overly mushy. |
| Vanilla Wafers | 1 box (about 48 wafers) | Nabisco brand is traditional. Graham crackers can be substituted. |
| Granulated Sugar (for pudding) | 1 cup | Adjust slightly to taste preference. |
| All-Purpose Flour | 1/4 cup | Provides thickening and structure. |
| Cornstarch | 1/4 cup | Ensures a smooth, lump-free custard. |
| Salt | 1/2 teaspoon | Enhances sweetness and balances flavors. |
| Whole Milk | 3 cups | 2% or skim milk can be used, but whole milk yields richer results. Use a non-dairy milk like almond or soy if needed. |
| Large Egg Yolks | 4 | Reserve the whites for the meringue. Use pasteurized egg yolks for safety. |
| Unsalted Butter | 2 tablespoons | Adds richness and a silky mouthfeel. |
| Vanilla Extract | 1 teaspoon | Pure vanilla extract is recommended for best flavor. |
| For the Meringue: | ||
| Large Egg Whites | 4 | Cold from the refrigerator are easier to separate. |
| Granulated Sugar (for meringue) | 1/2 cup | Superfine sugar dissolves better. |
| Cream of Tartar | 1/4 teaspoon | Stabilizes the egg whites for a fluffy meringue. Lemon juice can be substituted. |
Step-by-Step Instructions
- Whisk together granulated sugar, flour, cornstarch, and salt in a medium saucepan.
- Gradually whisk in the whole milk until smooth and no lumps remain.
- Place the saucepan over medium heat and cook, stirring constantly, until the mixture thickens.
- This process should take approximately 8-10 minutes. Do not boil vigorously.
- In a separate bowl, whisk the egg yolks until light yellow.
- Temper the egg yolks by slowly whisking about 1 cup of the hot milk mixture into them.
- Pour the tempered egg yolk mixture back into the saucepan with the remaining milk mixture.
- Continue to cook over medium-low heat, stirring constantly, for an additional 5-7 minutes, until the custard is thick enough to coat the back of a spoon.
- Remove the saucepan from the heat.
- Stir in the unsalted butter and vanilla extract until fully incorporated and melted.
- Pour the custard into a large mixing bowl.
- Cover the surface of the custard directly with plastic wrap to prevent a skin from forming.
- Let it cool slightly while you prepare the bananas and wafers.
- Line the bottom of a 9×13 inch baking dish with a single layer of vanilla wafers.
- Arrange a layer of sliced bananas over the wafers.
- Spoon about one-third of the slightly cooled custard evenly over the bananas and wafers.
- Repeat the layering process twice more: wafers, bananas, custard.
- Ensure the top layer of wafers is well covered with custard.
- Preheat your oven to 350°F (175°C).
- In a clean, dry bowl, beat the egg whites with an electric mixer on medium speed until foamy.
- Add the cream of tartar and continue beating until soft peaks form.
- Gradually add the ½ cup of granulated sugar, about a tablespoon at a time, beating on high speed until stiff, glossy peaks form.
- Spread the meringue over the top of the pudding, ensuring it touches the sides of the dish to prevent shrinkage.
- Create decorative swirls with the back of a spoon if desired.
- Bake for 15-20 minutes, or until the meringue is lightly golden brown.
- Remove the pudding from the oven and let it cool on a wire rack for at least 1 hour.
- Cover with plastic wrap (avoid touching the meringue if possible) and refrigerate for at least 4 hours, or preferably overnight, to allow the flavors to meld and the wafers to soften.
Prepare the Pudding Base
Cook the Custard
Assemble the Pudding
Prepare and Add the Meringue
Bake and Chill

Chef Tips for Perfect Results
- Use Ripe Bananas: Perfectly ripe bananas, with a few brown spots, offer the sweetest flavor and softest texture essential for this dessert.
- Temper Eggs Carefully: Slowly adding hot liquid to the egg yolks prevents them from scrambling, resulting in a smooth, velvety custard.
- Stir Constantly: Continuous stirring while cooking the custard ensures even heating and prevents sticking or burning on the bottom of the pan.
- Prevent Meringue Shrinkage: Ensure the meringue touches the edges of the baking dish. This creates a seal, preventing the meringue from pulling away as it cools.
- Allow Ample Chilling Time: Letting the pudding chill overnight is crucial. This allows the wafers to soften beautifully and the flavors to fully develop.
Common Mistakes to Avoid
- Using Underripe Bananas: Underripe bananas lack the sweetness and soft texture required, resulting in a less flavorful and potentially firmer banana layer. Always use ripe, spotted bananas.
- Overcooking the Custard: Overcooking can lead to a grainy texture. Stop cooking as soon as the custard coats the back of a spoon thickly. Using a double boiler can offer more control over heat.
- Not Tempering Eggs Properly: Pouring hot liquid too quickly into raw egg yolks will cook them, creating scrambled egg bits in your pudding. Whisk eggs and add hot liquid gradually.
- Skipping the Skin Prevention: A skin forming on the custard is unappealing. Press plastic wrap directly onto the surface of the cooled custard to prevent this.
- Not Chilling Long Enough: Early serving results in a pudding that is too firm, with undevelopedly wafer texture and melded flavors. Allow at least 4 hours, ideally overnight.
Variations and Substitutions
| Ingredient | Substitution | Impact on Flavor |
|---|---|---|
| Vanilla Wafers | Graham Crackers, Shortbread Cookies | Graham crackers add a honey-like sweetness; shortbread cookies offer a buttery, richer taste. |
| Whole Milk | Evaporated Milk (diluted), Non-Dairy Milk (Almond, Soy, Oat) | Evaporated milk can add slight caramel notes. Non-dairy milks may alter richness and creaminess slightly. |
| Vanilla Extract | Vanilla Bean Paste, Almond Extract | Vanilla bean paste provides visible vanilla flecks and a more intense flavor. Almond extract adds a distinct nutty profile. |
| Granulated Sugar | Brown Sugar (for pudding) | Brown sugar imparts a subtle caramel or molasses flavor, deepening the pudding’s complexity. Adjust quantity as brown sugar is sweeter. |
| Meringue | Whipped Cream, Toasted Coconut Flakes | Whipped cream offers a lighter, fresher topping. Toasted coconut adds a tropical crunch and distinct flavor. |
Serving Suggestions and Pairings
This old-fashioned homemade banana pudding is a perfect centerpiece for potlucks, family gatherings, and holiday meals. Serve it chilled, directly from the refrigerator, to best appreciate its creamy texture. It pairs wonderfully with a simple glass of cold milk or a hot cup of coffee. For a more decadent experience, a scoop of vanilla or French vanilla ice cream alongside the pudding is divine. It also makes an impressive dessert for birthdays or any special occasion where a touch of homemade goodness is desired.
Storage and Reheating
| Method | Duration | Instructions |
|---|---|---|
| Refrigeration | 3-4 days | Cover the baking dish tightly with plastic wrap to prevent dryness and odor absorption. Store in the refrigerator. If the meringue has softened significantly, gently scrape it off before serving or cover loosely. |
| Freezing | Not Recommended | Freezing can negatively affect the texture of the custard and bananas, making them watery and mushy upon thawing. The wafers also become unpleasantly soggy. |
Nutritional Information
| Nutrient | Amount per Serving (Approximate) |
|---|---|
| Calories | 350-450 kcal |
| Protein | 8-10g |
| Fat | 15-20g |
| Carbohydrates | 45-55g |
| Sugar | 30-40g |
| Fiber | 2-3g |
| Sodium | 100-150mg |
Frequently Asked Questions
Can I use different cookies instead of vanilla wafers?
Yes, graham crackers or shortbread cookies are excellent substitutions for vanilla wafers. These alternatives will impart their own unique flavor notes to the finished pudding, adding an interesting variation to the classic profile.
How do I know when the custard is thick enough?
The custard is ready when it consistently coats the back of a spoon. When you draw a finger through the coated spoon, the line should hold its shape without immediately dripping back together. This indicates the pudding has reached the desired consistency without overcooking.
My meringue looks a bit sad after baking, what happened?
Meringue can weep or become sad if the sugar was not fully dissolved or if it cooled too rapidly. Ensuring the meringue touches the sides of the dish can help prevent shrinkage. For a more stable meringue, try using superfine sugar and allowing the pudding to cool gradually.
Can I make this banana pudding ahead of time?
Absolutely, this old-fashioned homemade banana pudding is best made ahead. Chilling overnight allows the flavors to meld beautifully and the wafers to soften perfectly. Assemble and bake the meringue just before serving if you want the meringue to remain pristine.
How should I serve my banana pudding?
Serve this classic dessert chilled, directly from the refrigerator. A simple serving in bowls allows everyone to enjoy the layers of custard, bananas, and wafers. It can be garnished with a fresh banana slice or a dollop of extra whipped cream for visual appeal. Ensure each serving gets a bit of the meringue.
Rediscovering the joy of old-fashioned homemade banana pudding is a culinary adventure worth taking. This recipe provides a comforting taste of tradition, perfected for your kitchen. The interplay of creamy custard, sweet bananas, and crisp wafers, all crowned with a fluffy meringue, creates an unforgettable dessert experience. Embrace the simple elegance and rich history of this beloved American treat. Enjoy every spoonful of this comforting classic!