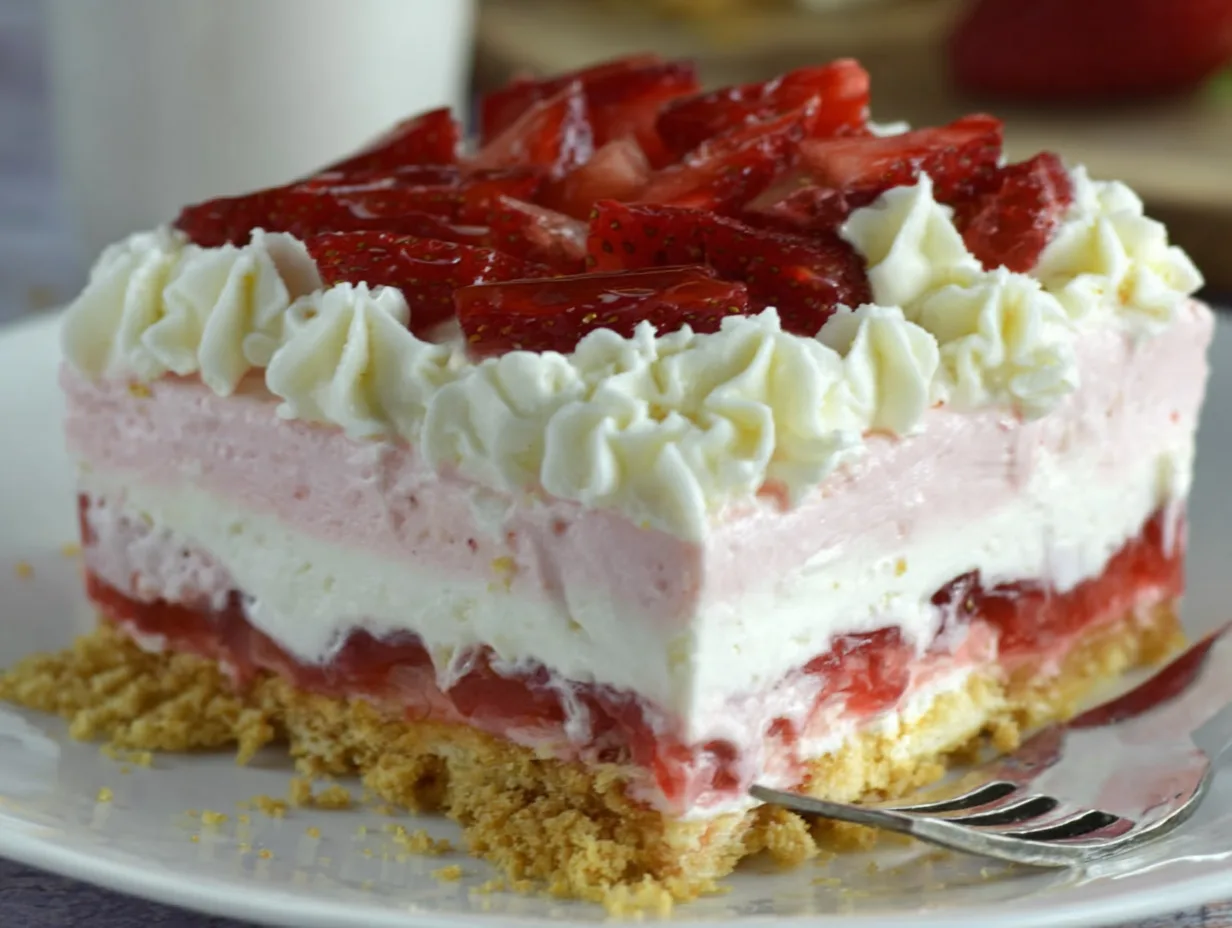

Looking for the perfect base for your gluten free tiramisu or a light cookie for afternoon tea? Gluten free ladyfingers are exactly what you need. These airy, spongy biscuits are surprisingly easy to make at home — and they taste even better than many store-bought versions. Whether you’re baking for dietary needs or just exploring new alternatives, mastering gluten free ladyfingers opens the door to countless desserts. In this article, we’ll guide you through the story behind them, how to make them step-by-step, and tips to store and use them in your favorite sweets — including your next tiramisu cake masterpiece.
The Story Behind Gluten Free Ladyfingers
Baking without gluten but not without love
James, our virtual chef, wasn’t always focused on gluten free baking. His journey started in the heart of home kitchens, where traditional ingredients ruled. But that changed the day his niece was diagnosed with gluten intolerance. Suddenly, every family gathering became a creative challenge. Cakes, cookies, and especially ladyfingers — staples in their tiramisu desserts — needed a transformation.
Ladyfingers may seem like a small detail, but for James, they carried weight. They were part of holiday traditions, birthday tiramisus, and coffee breaks. When switching to gluten free, the goal wasn’t just to replace flour. It was about preserving memories. After multiple attempts and countless test batches, James developed a version of gluten free ladyfingers that didn’t crumble, sag, or disappoint.
If you’ve ever tried store-bought gluten free options, you know they can be dry, chalky, or oddly sweet. Making them at home is a game-changer — and it’s easier than you’d think. For more recipe transformations like this, explore our family-friendly gluten free treats that put joy back in the kitchen.
Why gluten free ladyfingers matter
Ladyfingers may look delicate, but they hold up desserts like tiramisu — literally. Traditional versions rely on wheat flour and eggs for structure, but gluten free baking doesn’t always offer that same elasticity. That’s why most gluten free recipes either turn out soggy or rock-hard. James discovered that using the right starches (we’ll get into that in Part 2) creates a perfect balance between softness and strength.
They’re not just for tiramisu either. Gluten free ladyfingers are versatile. Serve them on the side of creamy desserts, dip them in melted chocolate, or pack them for lunchboxes. Light, slightly crisp on the outside, soft in the middle — when made properly, they impress gluten-free and non-gluten eaters alike.
So why bother making them yourself? Because freshness matters. Homemade gluten free ladyfingers soak up coffee or syrup beautifully without falling apart, which is critical for recipes like tiramisu cake. Plus, you can tweak them — adjusting sweetness, flavors, or even shapes to fit the dish.
As James likes to say, gluten free baking isn’t a limitation — it’s an invitation to get creative.
Ingredients and Tools You’ll Need

Choosing the right gluten-free flour blend
If you’ve baked anything gluten free before, you already know: the flour makes or breaks it. Gluten free ladyfingers depend on a flour mix that mimics the structure of wheat without becoming dense or gritty. That’s why James tested over a dozen combinations before landing on the perfect blend — one that’s light enough to rise yet strong enough to hold its shape.
The secret? A mix of superfine rice flour, cornstarch, and a touch of tapioca or potato starch. Rice flour brings smoothness, cornstarch gives structure, and the starches help lock in that spongy texture. If you’re using a store-bought blend, check that it contains at least two of those three elements. Avoid mixes with bean flours or heavy xanthan gum for this recipe — they weigh the batter down and prevent that light rise you need.
Some bakers also add a teaspoon of baking powder for extra lift, but James found that properly whipped egg whites are more reliable. It’s also important to use fresh eggs at room temperature. Cold whites won’t whip properly, and over-whipping can collapse the batter. If you’re curious about building your own blend, check out our gluten free baking foundations for detailed flour ratios and substitutions.
Flavoring matters, too. A touch of vanilla extract enhances the aroma without overpowering, and a pinch of salt balances the sweetness. For a subtle twist, James sometimes adds lemon zest — especially if the ladyfingers are going into a citrus tiramisu or a fruity parfait.
Essential kitchen tools for success
Once your ingredients are ready, having the right tools makes a noticeable difference. First up: a stand mixer or hand mixer. Since volume is everything in gluten free ladyfingers, beating the egg whites to stiff, glossy peaks is non-negotiable. A hand whisk can work, but it takes a lot more elbow grease — and time.
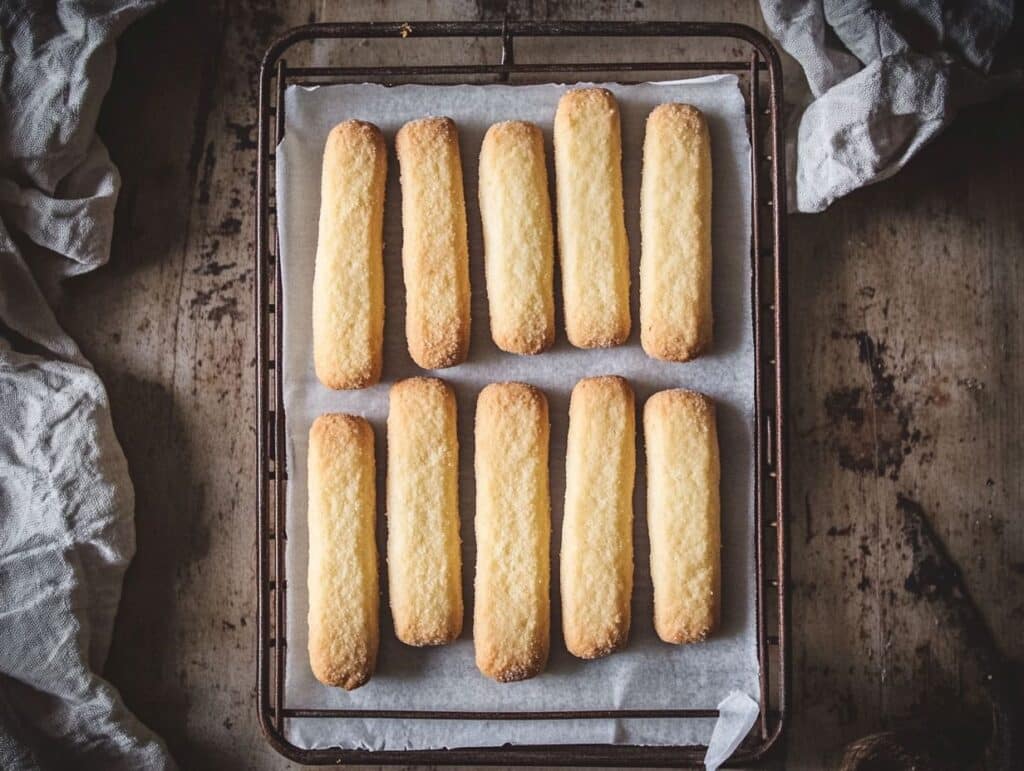
Next, you’ll need a piping bag fitted with a large round or French tip. Ladyfingers are all about shape and consistency. If you try to spoon the batter directly onto the tray, you’ll end up with uneven, misshapen cookies. With a piping bag, you get control over size, spacing, and symmetry — all of which matter when layering into desserts like tiramisu cake.
Line your baking tray with parchment paper, not silicone mats. Parchment allows better browning and prevents the delicate bottoms from sticking. A fine-mesh sieve is also handy — once baked, a light dusting of powdered sugar not only adds sweetness, but it also gives that bakery-finish look.
And don’t forget the cooling rack. Cooling ladyfingers properly prevents them from becoming soggy on the bottom. Once they’re out of the oven, a few minutes on the tray followed by gentle transfer to the rack is all it takes.
With the right ingredients and tools, gluten free ladyfingers aren’t just possible — they’re downright delicious.
Print
Gluten Free Ladyfingers – Easy Homemade Recipe for Light, Crisp Cookies
Light, crisp, and naturally gluten free — these homemade ladyfingers are perfect for tiramisu, trifles, or just enjoying with coffee.
- Total Time: 34 minutes
- Yield: 24 ladyfingers 1x
Ingredients
3 eggs, separated
½ cup granulated sugar
½ tsp vanilla extract
½ cup superfine rice flour
¼ cup cornstarch
1 tbsp potato starch
Pinch of salt
Powdered sugar for dusting
Instructions
Separate the eggs and let whites come to room temperature.
Whisk yolks with half the sugar until pale and thick.
Beat whites with salt to soft peaks, then add remaining sugar and beat to stiff peaks.
Mix yolks with dry ingredients, then fold in whites gently.
Pipe into 3-inch strips on parchment-lined trays.
Dust with powdered sugar and let rest 5 minutes.
Bake at 350°F (180°C) for 12–14 minutes.
Cool 2 minutes on tray, then transfer to rack to finish.
Notes
Use a piping bag with a wide tip for even shaping.
Add citrus zest or spices to customize flavor.
Store in airtight container up to 2 days or freeze for later.
- Prep Time: 20 minutes
- Cook Time: 14 minutes
- Category: Dessert
- Method: Bake
- Cuisine: Gluten-Free European
Nutrition
- Serving Size: 2 ladyfingers
- Calories: 45
- Sugar: 6g
- Sodium: 20mg
- Fat: 1g
- Saturated Fat: 0g
- Unsaturated Fat: 0.5g
- Trans Fat: 0g
- Carbohydrates: 8g
- Fiber: 0.3g
- Protein: 2g
- Cholesterol: 30mg
Step-by-Step: Mastering Gluten Free Ladyfingers
How it starts: air, structure, and patience
There’s something almost meditative about preparing gluten free ladyfingers from scratch. You’re not just combining ingredients — you’re building texture with care. The process begins with a familiar ritual: separating the eggs. This isn’t a step to rush. Let the whites come to room temperature while you whisk the yolks with sugar until they thicken and lighten in color. It’s the first sign you’re on the right track.
In another bowl, the egg whites become the backbone of the recipe. They need to be beaten until they stand tall — not foamy, not dry, but perfectly glossy. This step doesn’t just affect the height of your cookies; it decides whether your gluten free ladyfingers will turn out airy or fall flat.
Then comes the folding. This part often feels like a balancing act. Too rough, and the batter collapses. Too slow, and it overworks. The idea is to unite the whipped whites with the yolk-flour blend using smooth, wide turns of the spatula. You’re trying to protect the air you just created — and that’s where the magic happens.
From batter to bake: the little things matter
Once your batter looks light and consistent, it’s ready to be shaped. Transfer it into a piping bag — it gives you control. Make sure the tip is wide enough to let the batter flow without force. On a parchment-lined tray, gently pipe even strips, just a few inches long. You don’t need perfection, just consistency. That’s what gives your batch that professional look.
Sprinkle a bit of sugar over the top, not for sweetness but for texture. A slight crust will form as they bake, which adds contrast to the soft center. Let them rest for a moment before they go into the oven. This pause helps define their shape.
Bake at a steady 350°F (180°C). Don’t open the oven mid-way — the steam matters. After about 13 minutes, check their color. They should be golden around the edges, with a soft center that doesn’t collapse to the touch.
Once out, let the ladyfingers cool on the tray for a couple of minutes. Then gently move them to a cooling rack. This prevents moisture from building underneath. Let them cool fully before storing or layering into desserts.
Homemade gluten free ladyfingers are best used within two days, but you can freeze them too. Just wrap them tightly. When you’re ready to use them in something like tiramisu cake, they’ll bounce back beautifully.
Need more gluten free baking strategies? Dive into our no-fail pastry guides — they’ll help you level up your skills beyond ladyfingers.
Variations, Storage, and Creative Ways to Use Gluten Free Ladyfingers
Adding your own flavor to tradition
Once you’ve mastered the base recipe for gluten free ladyfingers, it opens up an entire world of flavor possibilities. While the classic version is light, neutral, and slightly sweet — perfect for soaking up coffee in tiramisu — there’s no reason to stop there. James quickly discovered that once he nailed the structure, he could start playing with taste.
A simple touch of lemon zest can brighten the whole cookie, making it ideal for spring desserts. A splash of almond extract adds richness and pairs beautifully with cherry or raspberry-based recipes. Vanilla is a given, but have you ever tried adding cardamom or cinnamon? These warming spices work particularly well in fall or winter desserts.
Want a chocolate version? Swap out two tablespoons of flour for cocoa powder. It’ll give you a deep cocoa flavor without compromising the lift. And for the holidays, consider rolling the piped batter in finely chopped nuts or coconut before baking — a subtle but festive twist.
Experimenting with gluten free ladyfingers isn’t just fun — it makes them more versatile. And if you’re looking for more ideas, visit our seasonal dessert twists or explore kid-friendly flavor variations that even picky eaters love.

Storing and using them beyond tiramisu
While tiramisu may be the most famous use of ladyfingers, these gluten free versions can do so much more. Once cooled completely, store them in an airtight container at room temperature for up to two days. If you live in a humid climate, refrigerate them to keep their crisp outer shell. Planning ahead? Freeze a batch. Wrap them in parchment and store them in a sealed bag. They’ll keep for up to 3 months and defrost quickly without losing texture.
When ready to use, they’ll be just as good layered into a creamy dessert as they were fresh from the oven. Beyond tiramisu, gluten free ladyfingers work wonderfully as the base of mini trifles, parfaits, and icebox cakes. Layer them with whipped cream and berries for a light no-bake treat. Or dip half of each cookie in melted dark chocolate for a crisp, café-style treat.
They also make an elegant addition to dessert boards — serve them with lemon curd, chocolate ganache, or mascarpone dip. Their firm yet delicate texture makes them ideal for soaking, stacking, or snacking.
The versatility is what makes gluten free ladyfingers such a kitchen staple. Once you’ve baked them a few times, you’ll find yourself reaching for them for all sorts of recipes — not just tiramisu. They’re a foundation. And when made with care, they become just as memorable as the dessert they’re in.
Looking for more ways to turn gluten free basics into something extraordinary? Don’t miss our no-bake recipe collection and weekend-worthy treats that fit right into your home baking rhythm.
Are ladyfingers naturally gluten free?
No, traditional ladyfingers are made with wheat flour and are not gluten free. To enjoy them without gluten, you’ll need a modified recipe using a blend of rice flour, cornstarch, and starches. Homemade gluten free ladyfingers replicate the texture perfectly and are ideal for tiramisu or other no-bake desserts. For more baking alternatives, visit our gluten free recipe collection.
What can I substitute for ladyfingers in a gluten-free tiramisu?
If you don’t have gluten free ladyfingers on hand, sponge cake or gluten-free graham crackers can work. However, they may not soak as well. For the best structure and authentic texture, homemade gluten free ladyfingers are your best option. You can even freeze a batch ahead. Need a recipe? Browse our no-bake tiramisu ideas.
How do I keep gluten free ladyfingers from going soggy?
To avoid sogginess, lightly dip your gluten free ladyfingers in liquid — don’t soak them. A quick dip in cooled coffee or syrup is enough. Letting them cool fully after baking also prevents them from becoming soft underneath. Proper storage in a dry, sealed container helps them stay crisp. More tips are available in our baking techniques section.
Can I freeze homemade gluten free ladyfingers?
Yes, gluten free ladyfingers freeze beautifully. Once cooled, wrap them in parchment and store in a sealed freezer bag. They keep for up to 3 months. When ready to use, defrost at room temperature or overnight in the fridge. Their texture and flavor hold up perfectly, making them a great prep-ahead item for tiramisu and more.
Conclusion
Gluten free ladyfingers are more than just a substitution — they’re a way to bring classic desserts back to your table without compromise. With the right ingredients, gentle techniques, and a touch of creativity, you can enjoy airy, spongy cookies that are just as good (or better) than traditional ones.
From tiramisu to chocolate-dipped snacks, these ladyfingers open the door to countless dessert ideas. If you’re exploring more gluten free creations, don’t miss our home baking favorites and kid-approved recipes.
Because gluten free shouldn’t mean giving anything up — especially not dessert.